|
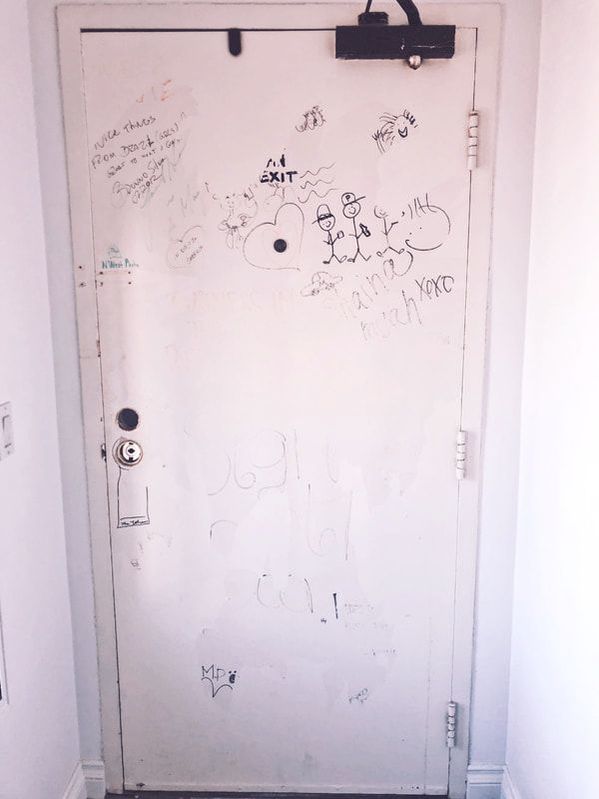
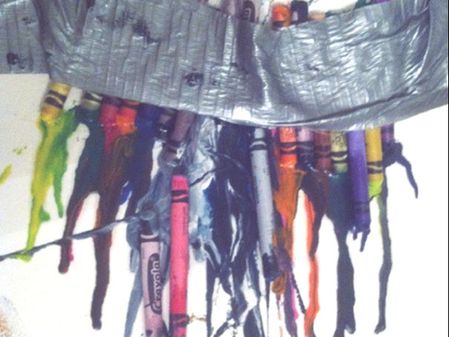
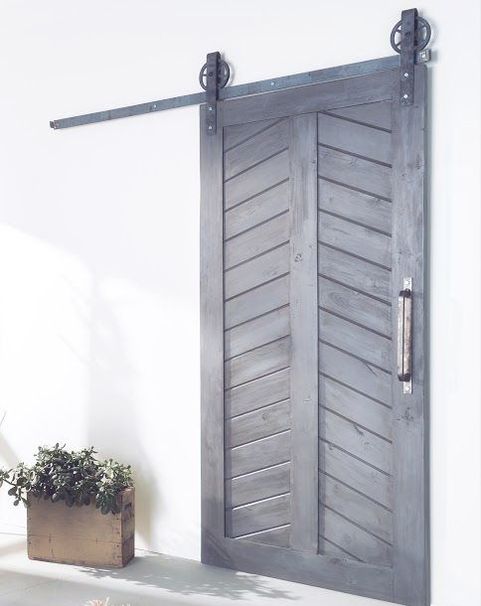
2/20/2018 0 Comments Turning Around a Door DisasterWhen we moved in about 4 years ago, the previous renters had decided to use their front door as a guest book. Although, I do think that is a pretty cute idea, it didn't really look that great nor did it mean anything to us. So we took the quickest and easiest solution and painted the door. Sadly, after about 3 years, the dark marker started bleeding though the paint as pink and yellow hues. Given my love for DIY, I saw the perfect opportunity for a transformation.
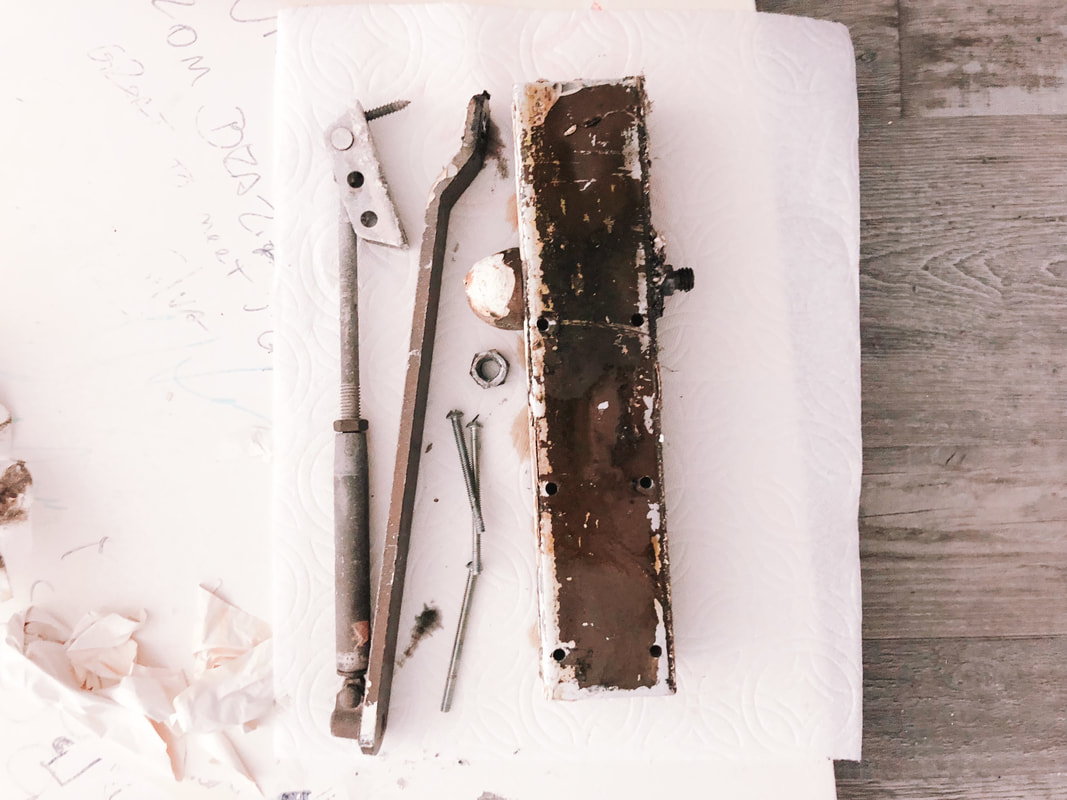
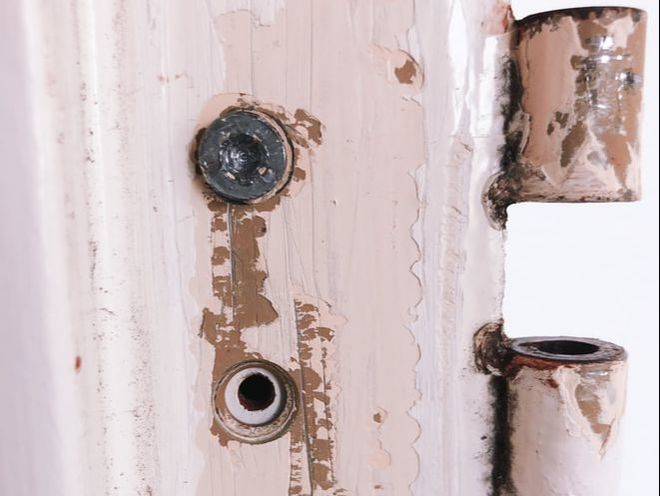
The building is about 50 years old and everything was definitely original to the building. The hinges had been painted over at least 7 times, the screws were all stripped and the door closer was rusty and leaking oil.
Tools Needed:
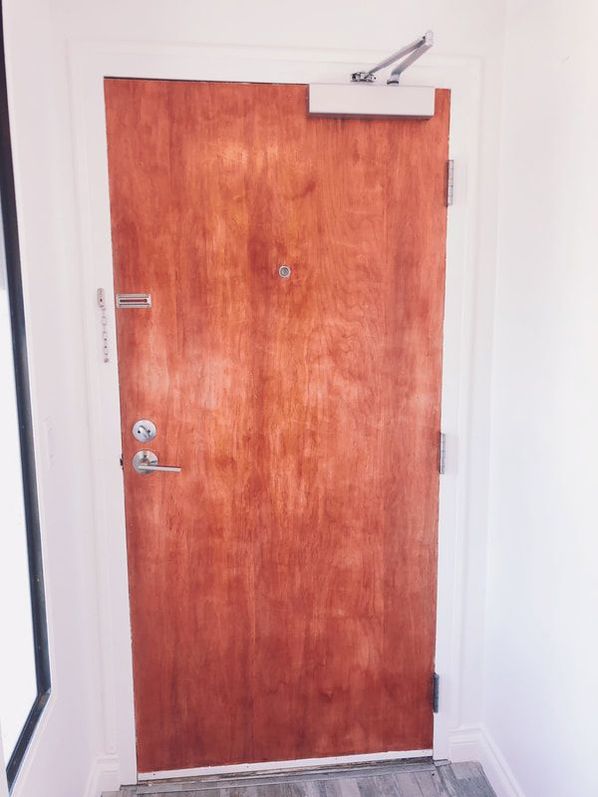
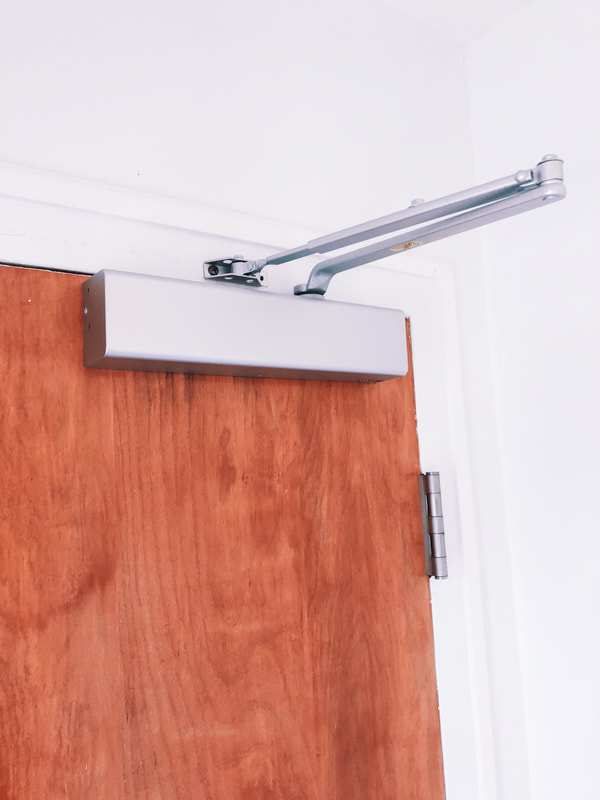
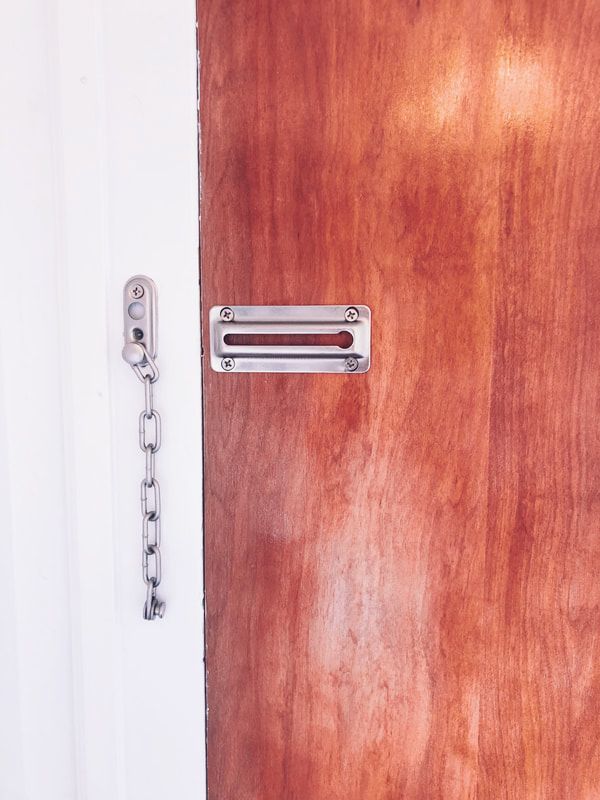
High Level Steps1. Remove the Door and Hardware We started with using the drill to remove all the hardware pieces. The old door closer, chain lock, handle and bold locks. Then we used the screw extractors and digging out the screws. My husband then helped me take down the door and lay it face down. 2. Sand Paint This is the part that took the longest. Since there were about 7 layers of paint it took quite a lot of patience to get to the beautiful wood layer that was underneath. I worked on this project over the course of a few weekends so this was a great shot of a midway point in the sanding process. 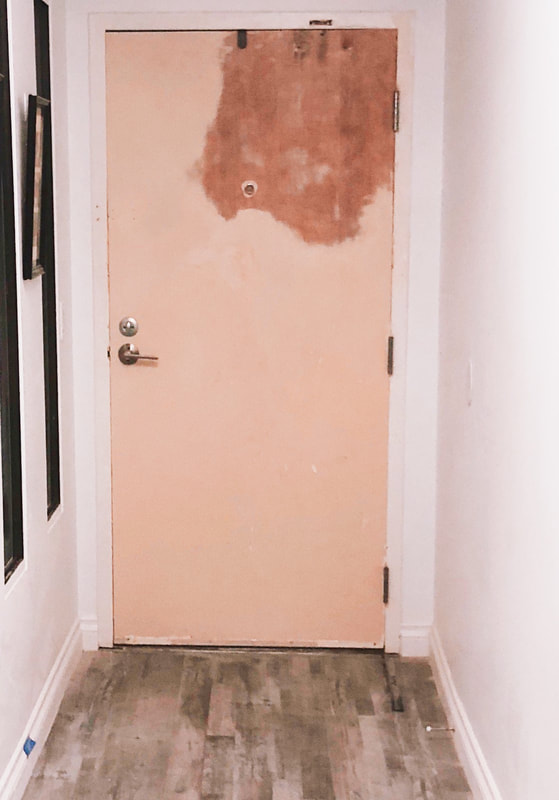 3. Replace Hinges Depending on the extent of damage to your door, you may not need new hinges. As you saw above, ours were rusty and covered in paint so a fresh set was definitely needed. We lined up the new hinges with the same holes on that the old ones had and drilled with a fresh set of screws. This part required two people, one to hold the door in place and the other to tighten the screws. 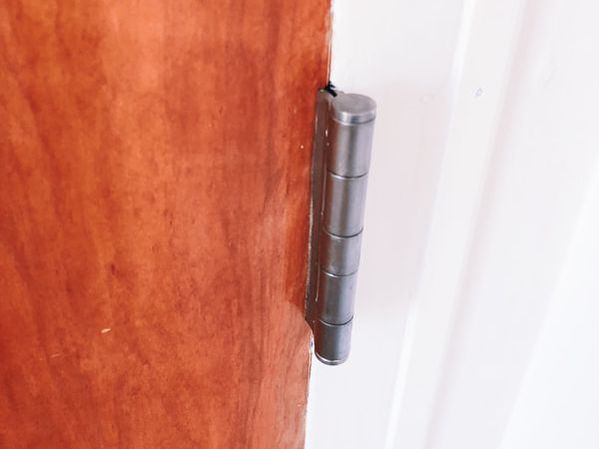 4. Stain the Door Make sure that before you stain the door, you take a damp rag over the entire surface area to ensure that all the little pieces are sawdust are removed. If you are using a stain with polyurethane it will make for an efficient stain giving the wood both color and a gloss finish, however, a rag isn't the best tool for applying something like this. You will want to get either a paint brush made for polyurethane or a foam brush like this one. I ended up doing 3 coats to get a nice even layer and robust color. 5. Measure and Cut Trim Using the miter box for this was amazing. I measured but laying the trim against the wall where I wanted to put it and drew a light pencil mark at the cut point. I then used the miter box's 45 degree angle to cut the pieces with the finishing angle. 6. Apply Trim Utilizing the finishing nails, I hammered at the top of the trim and applied additional nails every 2-3 feet to keep it secure. It looks great as is, however, there is a small gap between the door frame and the trim and that is where our handy dandy caulk comes in. I applied a light single layer to the gap and let it dry for about 2 hours. The last piece to the trim was the paint. I used the same paint color as the walls, but you could always add a contrasting color. I think a navy or black would really make the wood pop (something to add to my to-do list) 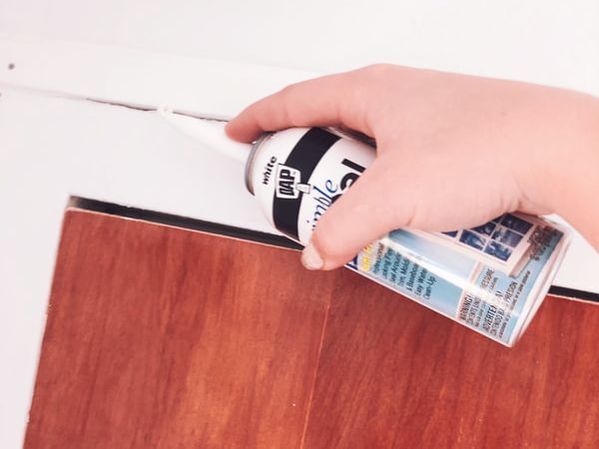 7. Add New Hardware The key here was just following the directions within the packaging. Adding the new door closer and lock give the perfect "accessories" to the newly stained wood.
The Final Product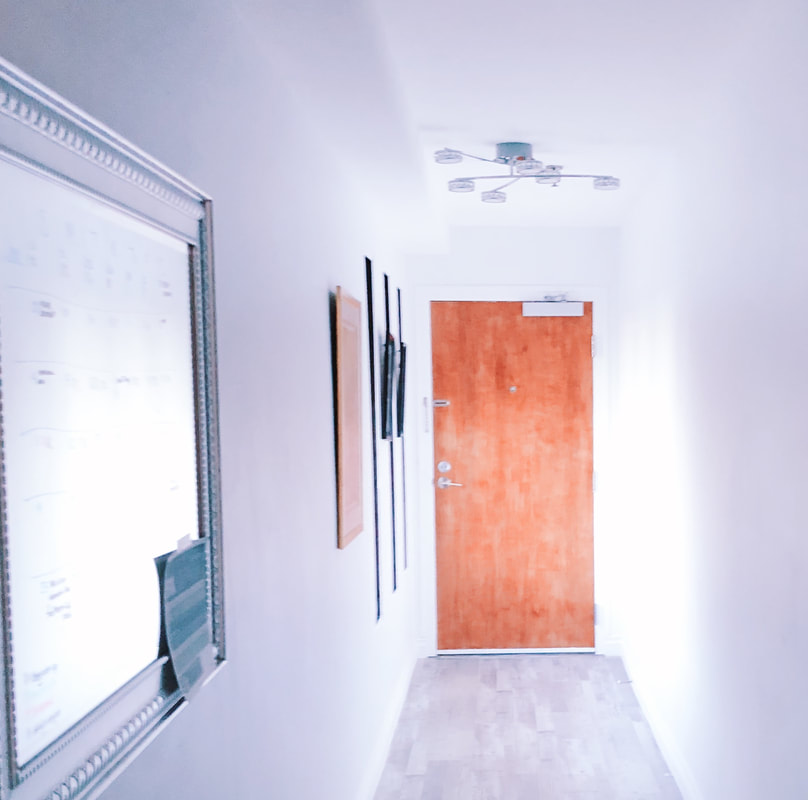 This project was definitely a labor of love, especially because it was not done in one fell swoop. Instead, it was done over the course of a few weekend segments with the door going up and down. There were plenty of frustrating moments but I learned so much along the way and am so happy with the feature at the end of our hallway that we now have. Thanks for stopping by and being a part of the door journey on my instagram stories. See you all soon and looking forward to the next Beyond the Clock DIY. xoxo,Jessica
0 Comments
  This post may be a bit more technical, but with each DIY project I learn nuances that can make or break a project. These #DIYTip posts are aimed to help with the "behind the scenes" of the DIY projects you see online so you don't end up with one of these Pinterest/craft fails
Let's start out with what the heck is a pocket hole. Before taking on the project for our nightstands, I had no idea what they were.
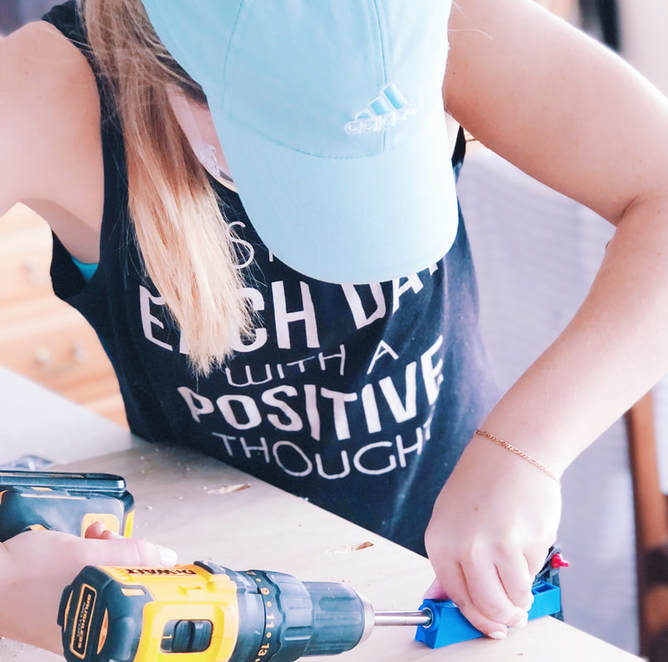
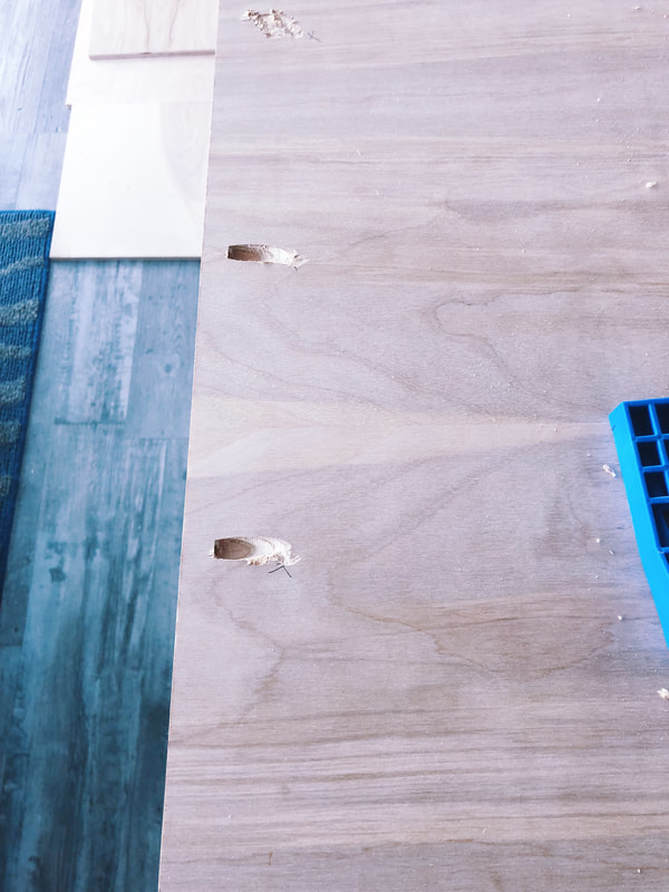
Basically, it's used when joining two pieces of material - usually wood, at a perpendicular angle. To make a pocket hole, you will need a Kreg Jig, this mini one was great from Amazon. To make your life easier, you will also want to get a clamp or two to help hold your pieces in place. The best I've used so far here. The other key piece you will want to take into account before starting your pocket hole is knowing what width of material you are using. I was following a DIY guide and missed the width specifications, opting instead for the wood I preferred at Home Depot (it was 1/2 inc width instead of 3/4 inch). I never thought a quarter inch would be such a big deal, but when it comes to pocket holes it is. Here is a quick cheat sheet for how to use your Kreg Jig and combination for screw type and wood width.  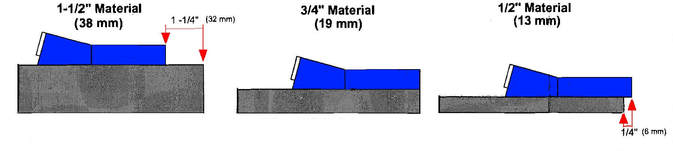 Since I had combined 1/2 inch material with 1-1/4" screw, each time I tried to join the two pieces together, the screw would pop out on the other end. Before doing this research, I adjusted the Kreg Jig placement to accommodate the length of the screw, and then instead of going too far down, it went at two steep of an angle and tore through the side. Hope this cheat sheet helps you and saves you a few screws and wood pieces in your next project and if you have any questions feel free to comment below, or DM on instagram. Happy DIYing.
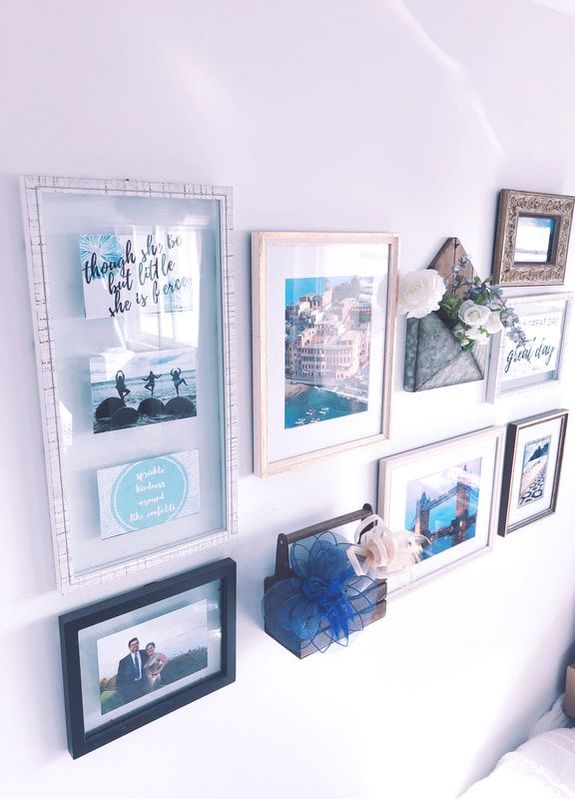 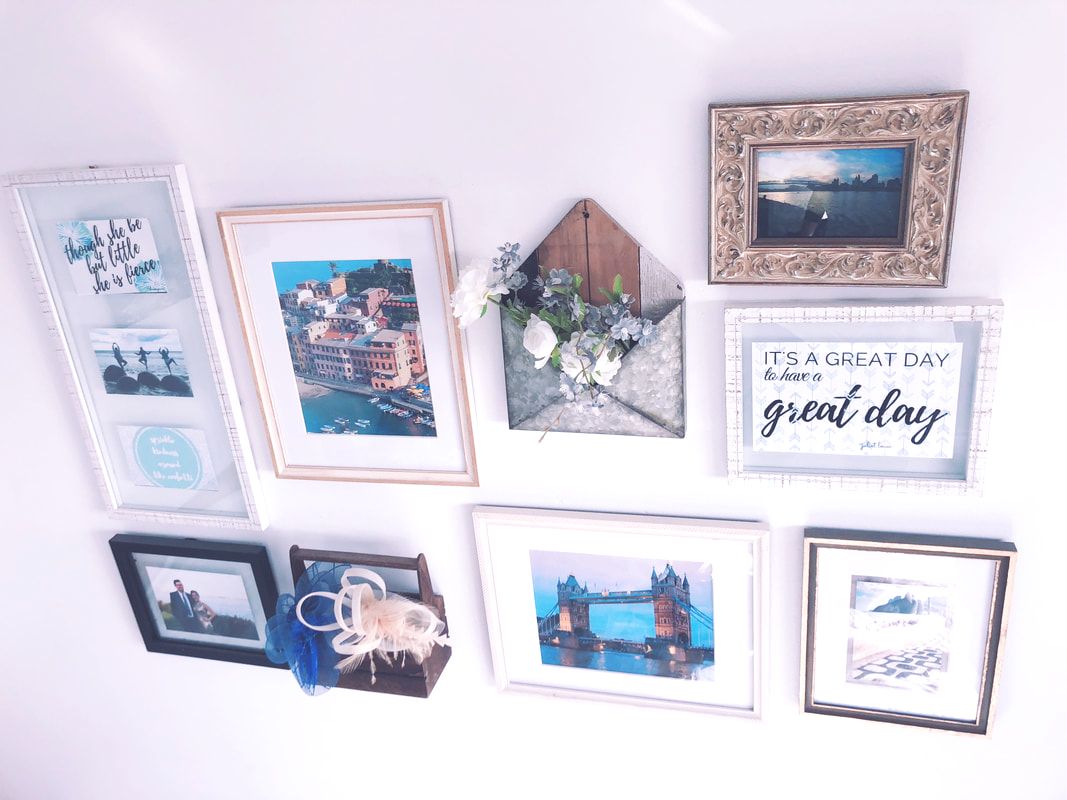 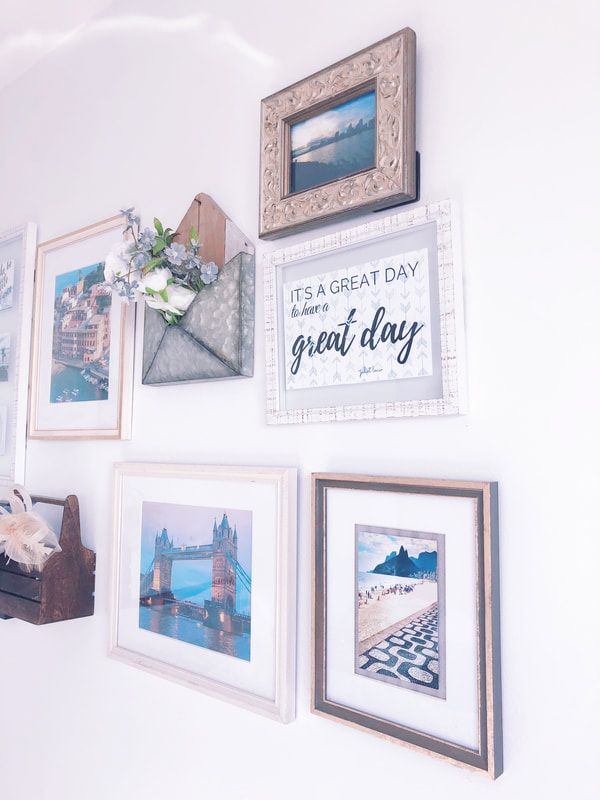 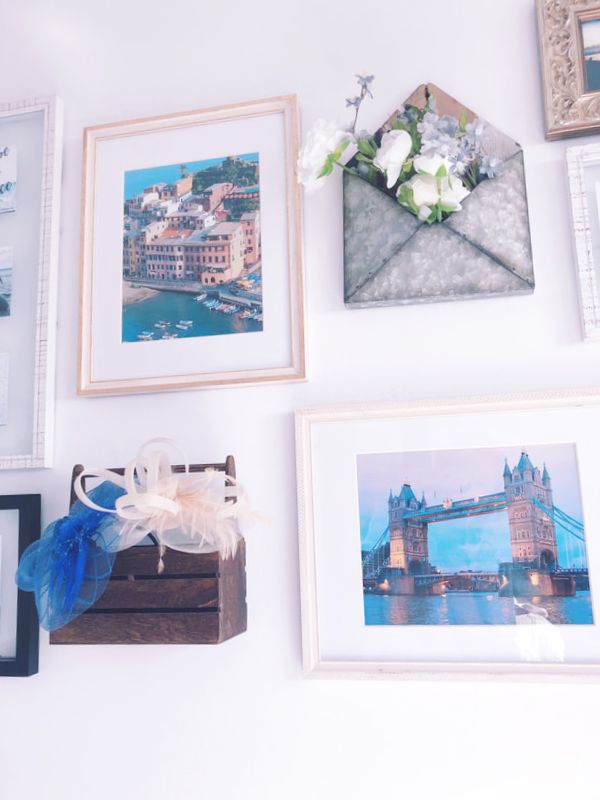 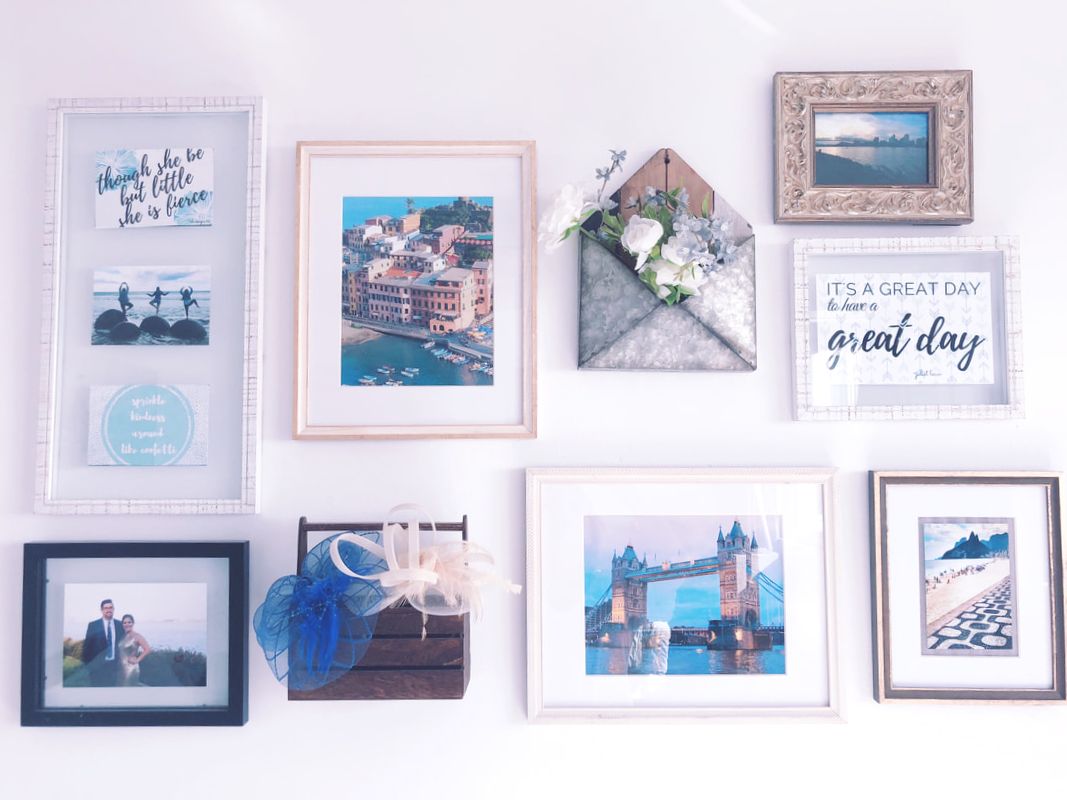 Frames, wood box and flowers: Michaels, Envelope: Michaels, similar here and here. Photo printing: CVS There are a lot of ways to build a gallery wall. You can make it large or small, long or tall, busy or minimalistic. Whatever your style may below are key pieces to remember when making your gallery wall. 1. Display what is important to youPictures of your family, place you love to travel to, favorite patterns or shapes all are great things to incorporate into your gallery wall. The best way to start is to pick a theme. In the gallery wall I put together above for my sister, I played on quotes she loves and her favorite places she has traveled to. Some of the photos were taken by her and others were great stock photos found online that captured the essence of the city. In sticking to your theme pick 2 or 3 dimensional pieces, these are the ones that have a bit more depth. It could be a shadow box with an object inside or it could be a clock, bowl, or basket. I'm a big fan of something you can fill like the envelope above so you can change whats inside with the seasons or occasion. 2. Incorporate into the overall room designIf you are working with a dramatic mood room, pick bold thick frames with artwork that contrasts the colors and pops against the room. If you are working with a more neutral space, pick frames in whites and thin framed metals with artwork that may be light and airy. My sister was going with a white bedroom theme plus a few teal accents so this gallery wall highlighted those pieces while adding dimensionality and color. 3. Balance the SpaceYou have a whole wall yes, but does that mean you should use all of it? Maybe? When setting up your gallery wall start by measuring the width of the space you have. It could be from a piece of furniture to the end of the wall, or it could be wall to wall. Now step back from the wall about 5-10 ft and ask yourself is there furniture or anything else in my line of site? Measure from the top of that object to the ceiling. I find that if you give yourself 1.5-2.5 feet on all your edges, you can create a centered look and add the asymmetry within your gallery wall to create the perfect balance. Now look for frames of varying sizes to fit within your dimensions. It doesn't have to be a perfect fit, instead use these dimensions as a guide to help you get the right materials. 4. Lay it outWith the frames, photos, and dimensional pieces in hand, use an open part of the floor and layout your pieces in the same overall dimensions as the wall space you specified. This may take some time moving pieces around to find the right balance. My rule of thumb is to keep a frame of similar look or size one to two objects away from each other. That way your eye naturally moves between differing pieces in a cohesive way rather than getting stuck on one section of the wall that looks the same. Remember the best part about a gallery wall is that it highlights the special aspects of both you and the room, so believe in yourself and give it a try and remember if you ever need help, send a picture of your space via email or DM me on isnta. I always love to help! xoxo, Jessica
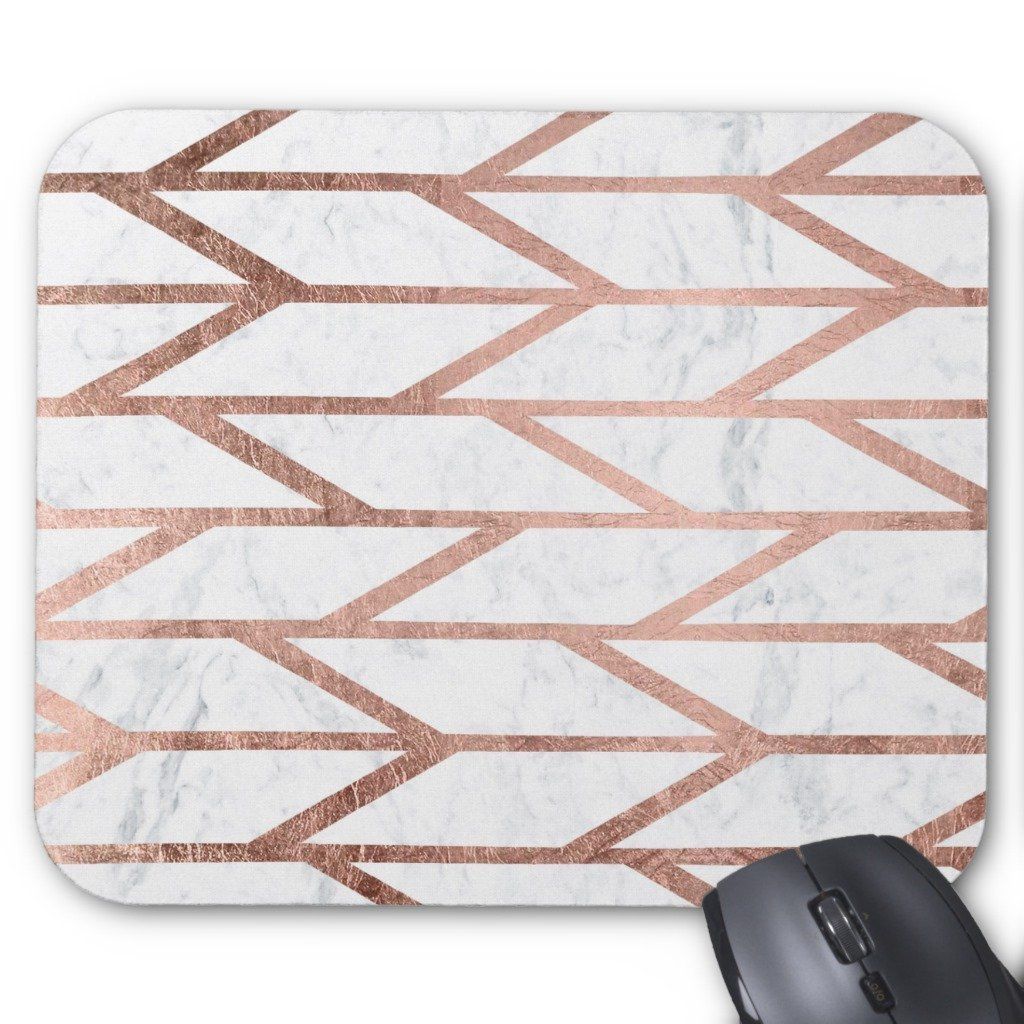
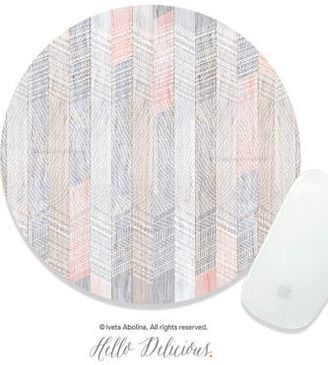
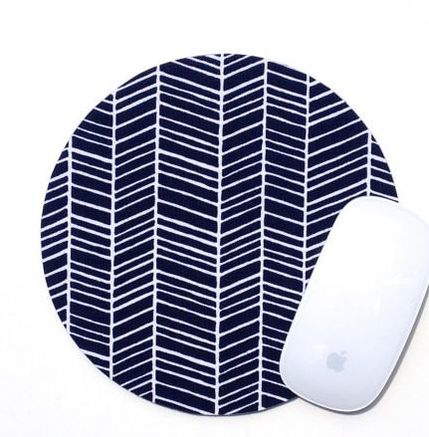
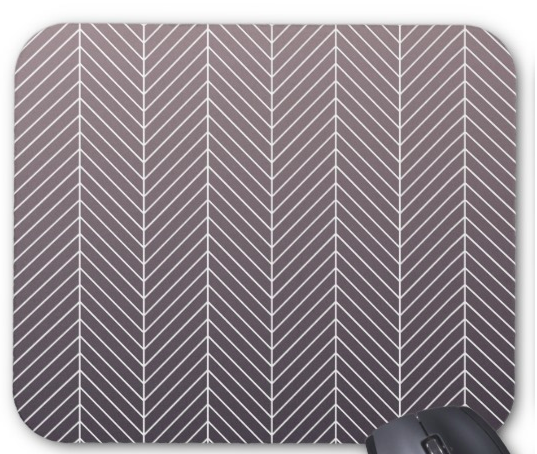
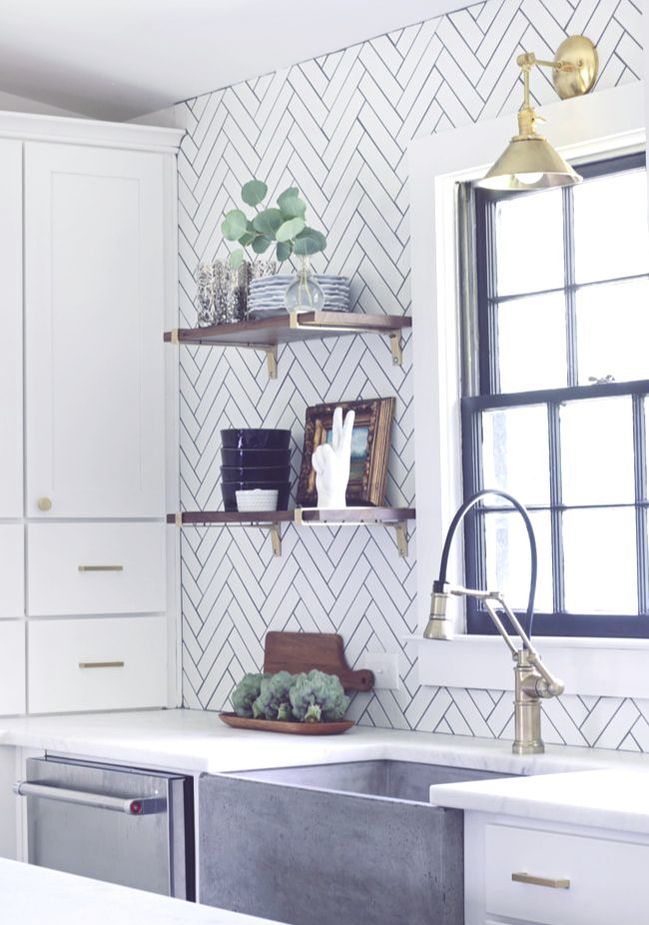
One of my absolute favorite patterns in the world is herringbone. Some people refer to it as chevron (although there are slight differences) both are details I absolutely love to incorporate in my home decor. Whether it is solid colors, mixed hues, matte or metallic finish, this quintessential pattern can bring a cute accent to a nursery or a calming focal point to a living room. In fact, depending on the width if the rectangles involved in the design or the cadence of color you can yield different results for your room that no matter what are sure to be a talking point to any guest (and an eternal love in your heart).. So, without further adieu, here are the top 14 ways to use herringbone in your home. 1. Mouse Pad This one may seem a bit out there, but was inspired by my mouse pad sitting on my desk as I write this post :-). Sometimes the most subtle ways of incorporating patterns in your house are the best. Plus, using a mouse is much more ergonomically friendly for yourself, so do your office and your carpel tunnel wrist)a favor and spice up your office with some of these Amazon, Zazzle and Etsy finds.
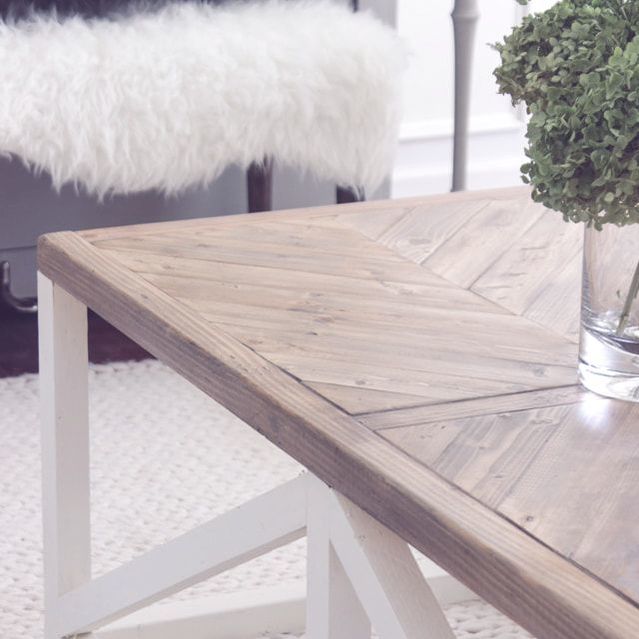
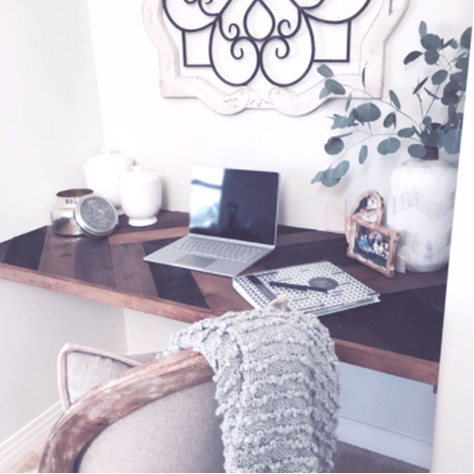
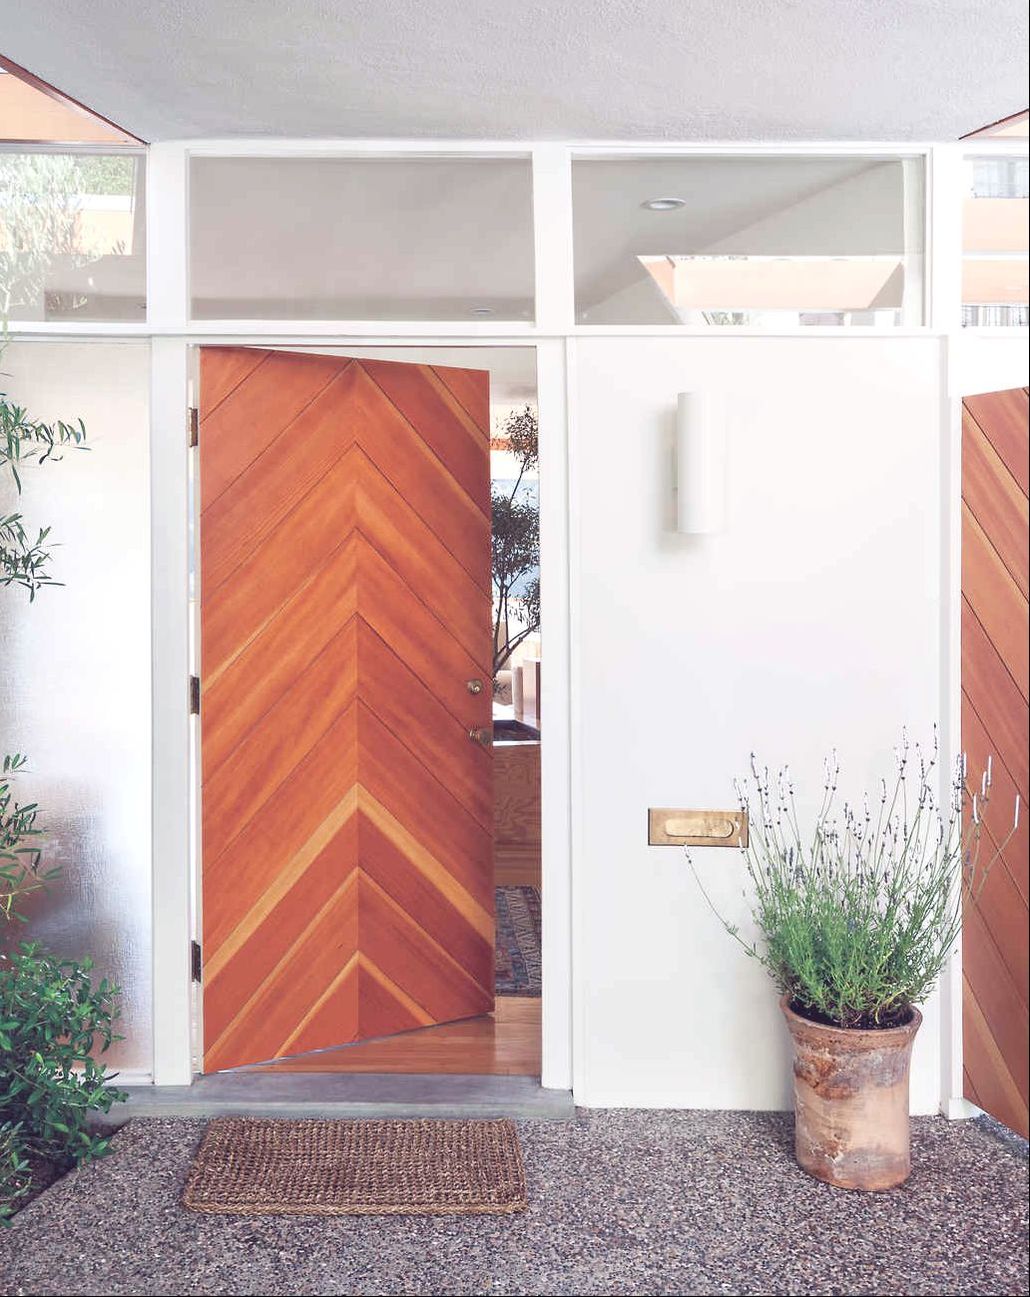
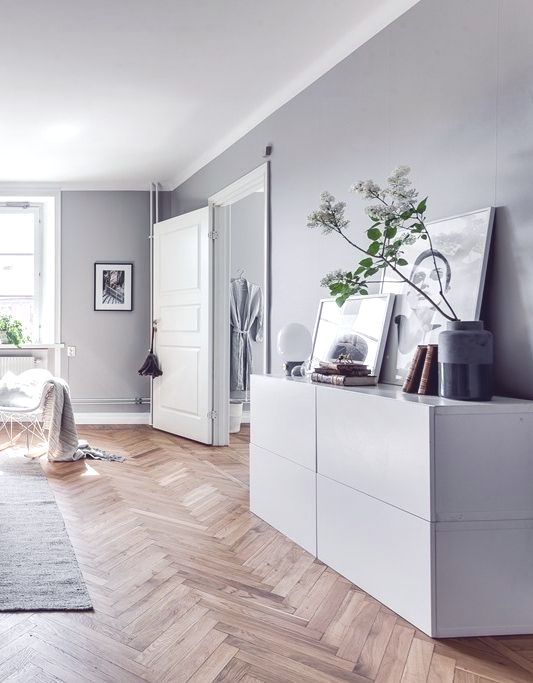
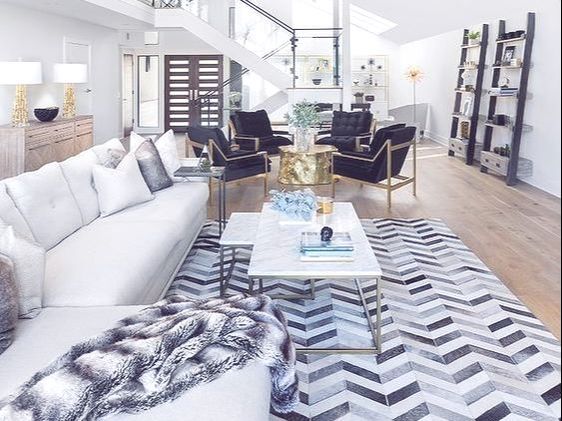
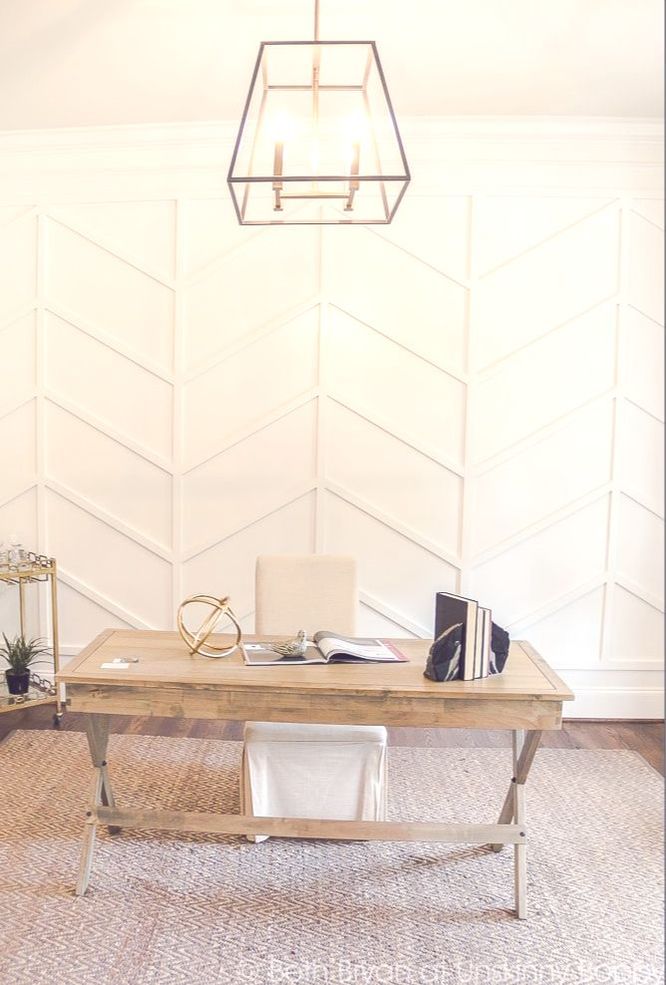
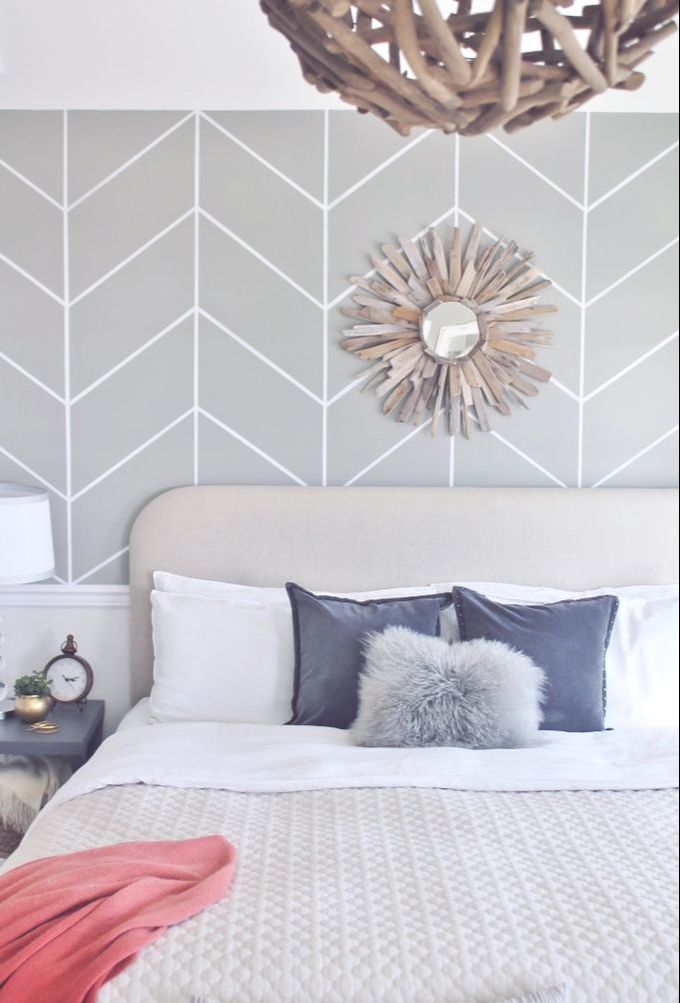
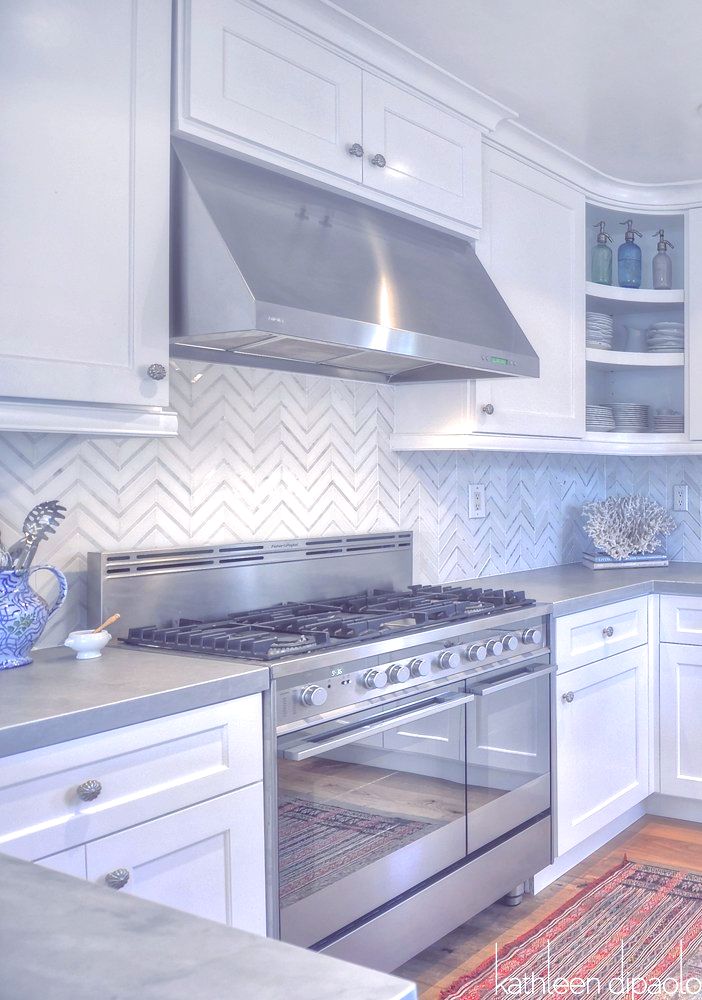
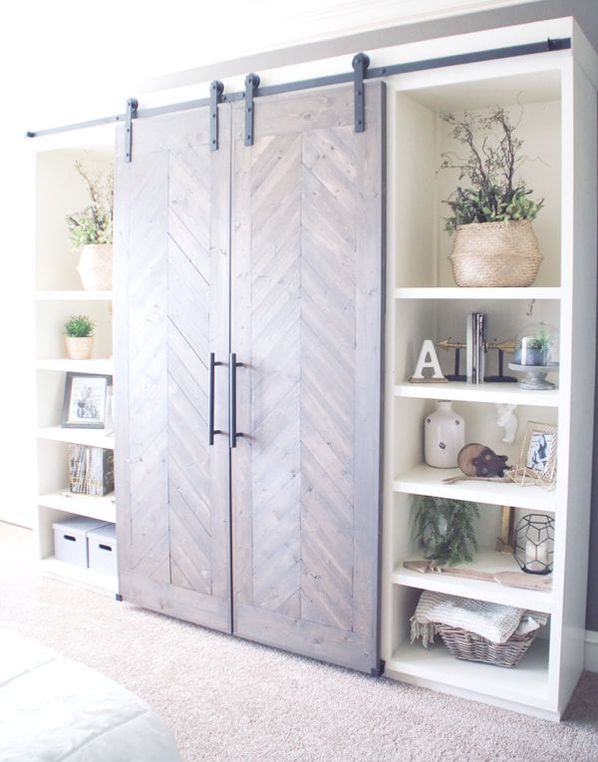
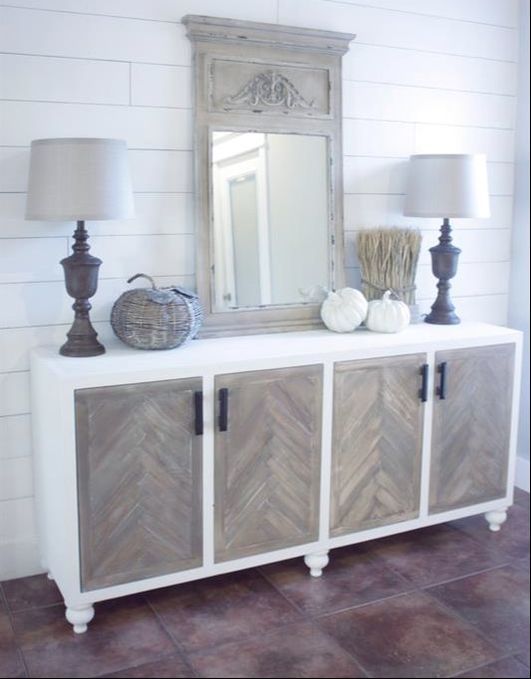
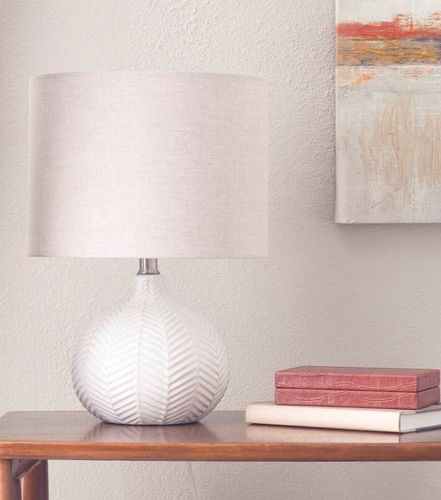
2. Desk or Table TopAdding some character to your workspace or breakfast nook is the perfect way to find inspiration for your day. Follow the arrows from this inspiration up, up, up! 3. DoorsWhat better way to welcome someone into your home than with a statement piece. Both the front door or transitioning between rooms in your home the pattern will create the natural entrance and welcoming party. 4. FloorsWhen it comes to flooring there are SO many options. First, choose from your material, hard wood floors, tile (ceramic or porcelain) or on the least expensive side, add a rug with lots of WOW factor to capture the room and create flow. 5. Accent WallUsing herringbone or chevron as an accent wall is an excellent way to make your room feel more spacious. If the arrows run up, it brings you length and if they run sideways you get the illusion of extra width. Some of the best ways to get this effect are via wall paper, stencil paint, or wainscotting 6. BeddingThis one is near and dear to my heart. Last Thanksgiving, I spent Black Friday searching the internet for the perfect bedding. Since my obsession with herringbone and chevron are REAL, I was so excited when I found the perfect pair with this comforter and quilt combo. 7. BacksplashWhite kitchens and bathrooms are trending big time and sometimes can be painfully plain. Sticking with the white theme but incorporating active patterns is a great way to bring dimension and interest to the room without necessarily needing too much color. On the contrary, you can add great contrasting dimension with dark moody colors that make your 8. CabinetryThink TV consoles, nightstands, side boards and more! I'm currently drawing up plans for a wall bed with herringbone accents (stay tuned for the DIY magic). Match it with solid colored furniture and a few patterned throw pillows and you will have a living room to die for.
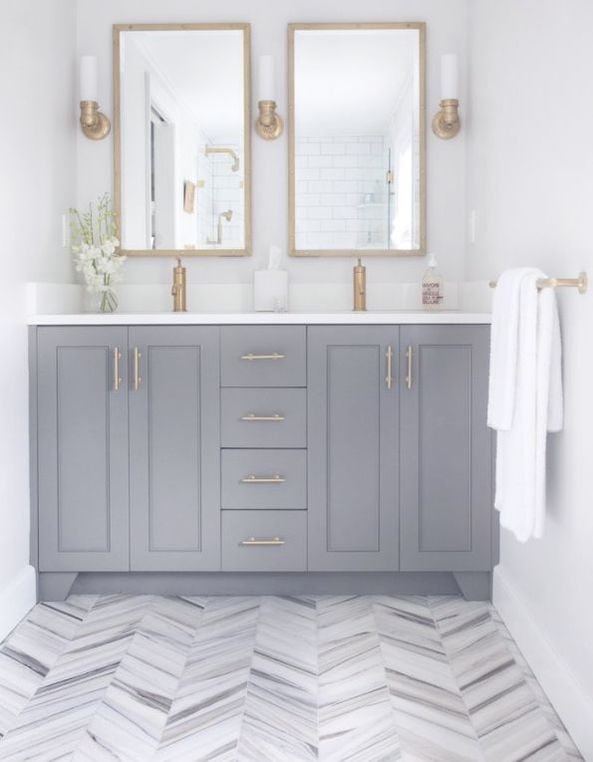
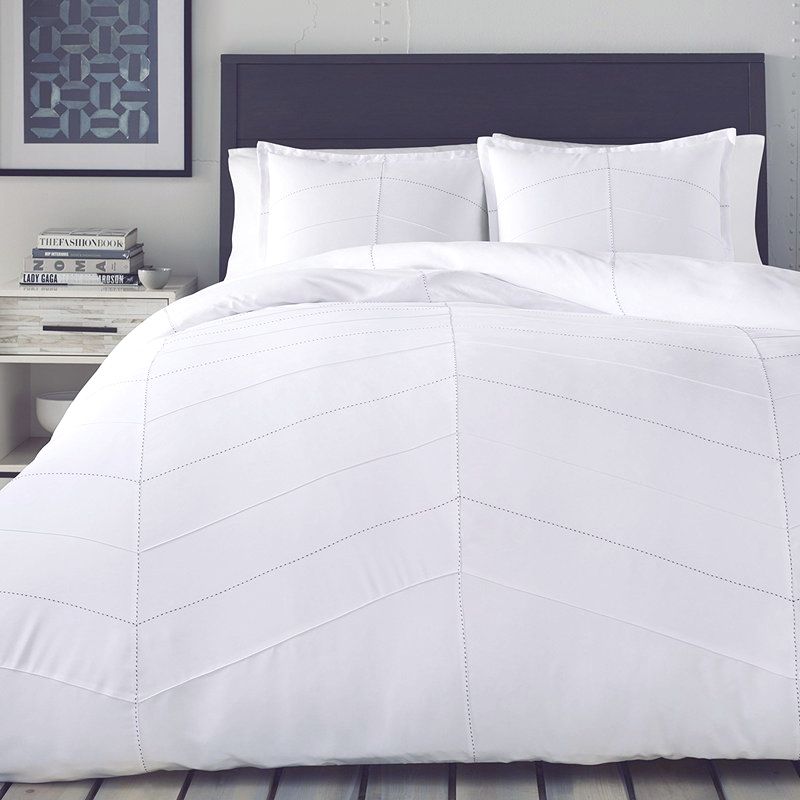
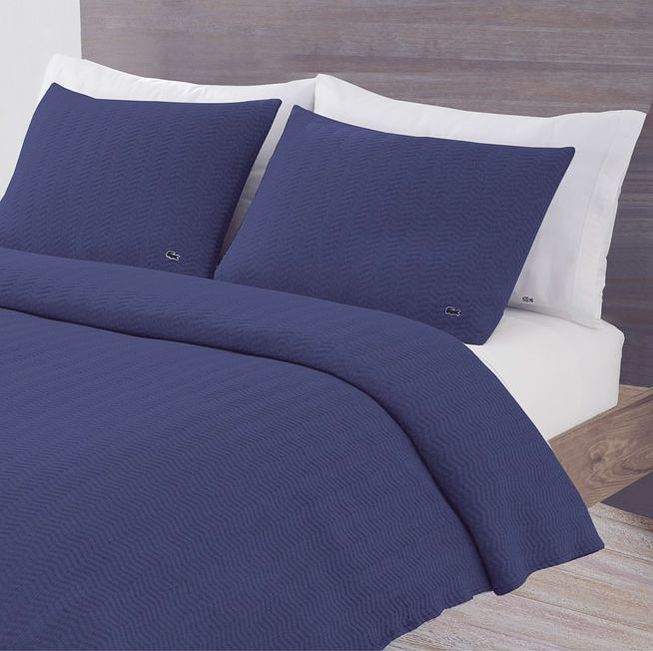
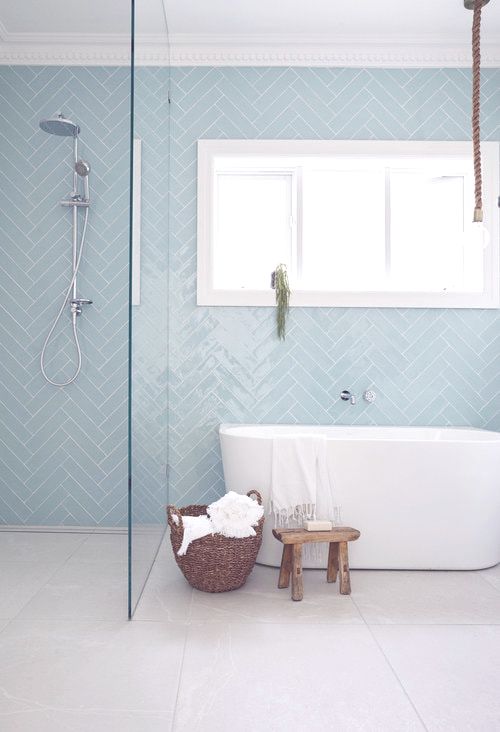
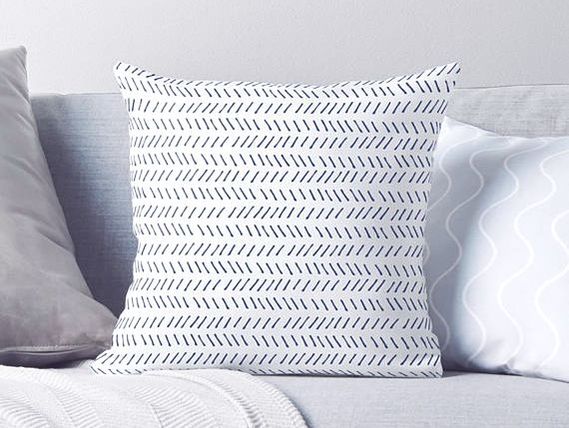
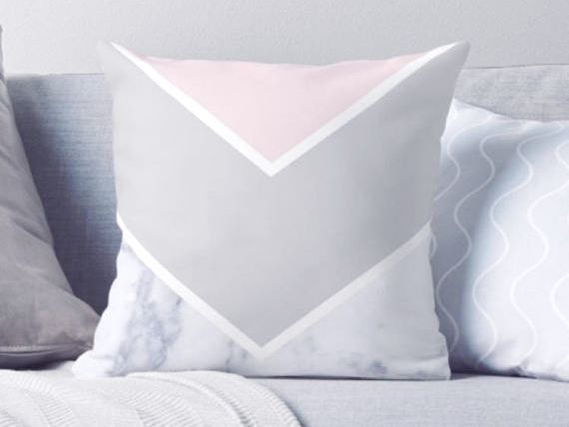
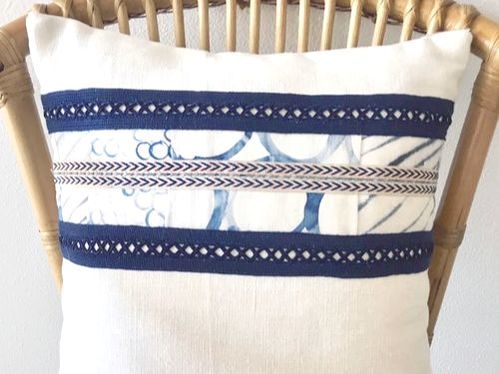
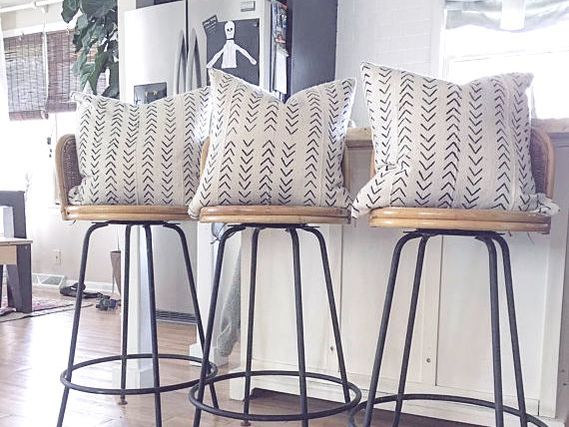
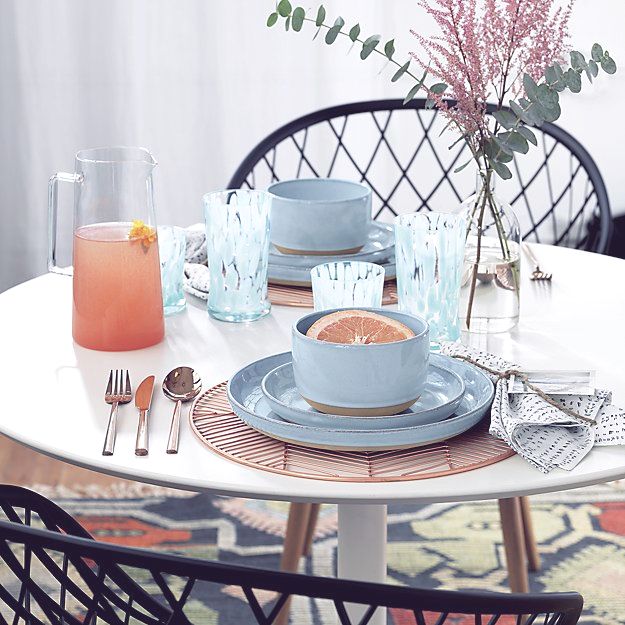
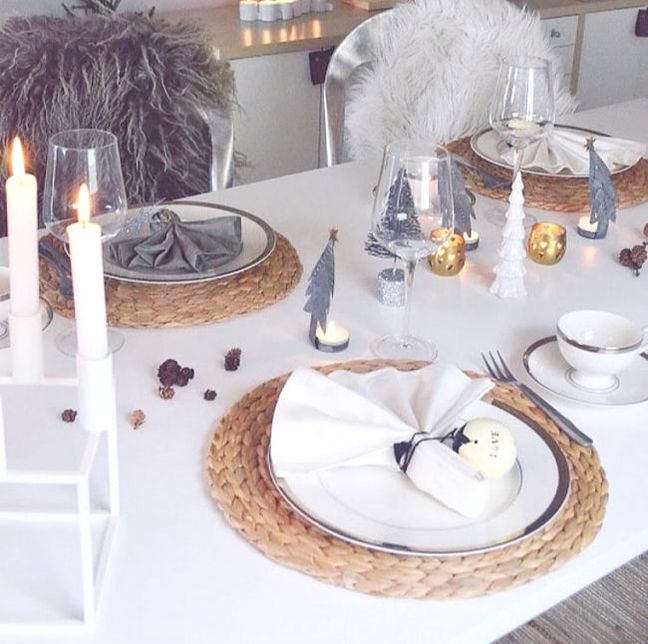
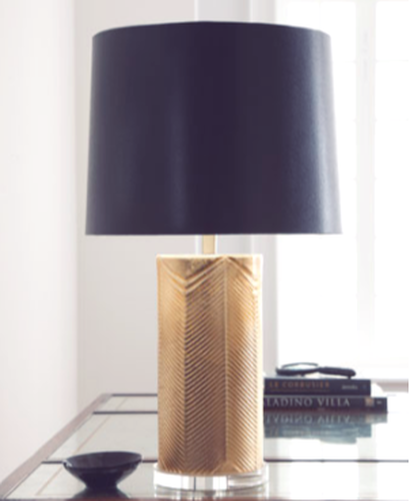
9. ShowersShowers, especially those with glass doors, are an amazing opportunity to make a feature just like the accent wall. Create a spa-like environment with soothing colors and natural wood accompaniment. I'm especially a fan of extending the design into another part of the bathroom, for example the shower to floor continuity (left) and shower to wall continuity (right). 10. Throw PillowsYou know I'm all about combining beautiful design with functionality. Pillows can sometimes feel like the complete opposite, more like the nuisance item that we keep throwing on and off the bed or couch. Although, this may be true some of the time, they actually are really important for back support when sitting to optimize your ergonomics. Also, when I'm on my laptop on the couch, I use the pillow as a psuedo table so that the hot laptop isn't on my lap. So there you have it, you no longer have to feel any guilt when adding another throw pillow to your decor. Enjoy the inspiration from some of these. 11. PlacematsGrowing up, every single dinner, my mom would set out placemats, even if it was just the 5 of us. We would sit around the table, share stories about our days, and enjoy the delicious homemade meals. Now that I have my own place, I still use placemats and have been looking for some new ones, the two below are top contenders. 12. LampsTable lamps are a really great way to continue a design influence you may have going in your room. If you have herringbone bedding or flooring, add a lamp with some herringbone in a different color or textile. This is a great way to bring consistency to the room at varying eye levels. There is no doubt that however large you take it or how small the detail is, chevron and herringbone make your decor POP! What are some of your favorite ways to use herringbone? Or maybe even better, what are your favorite patterns to use in your decor. xoxo,Jessica
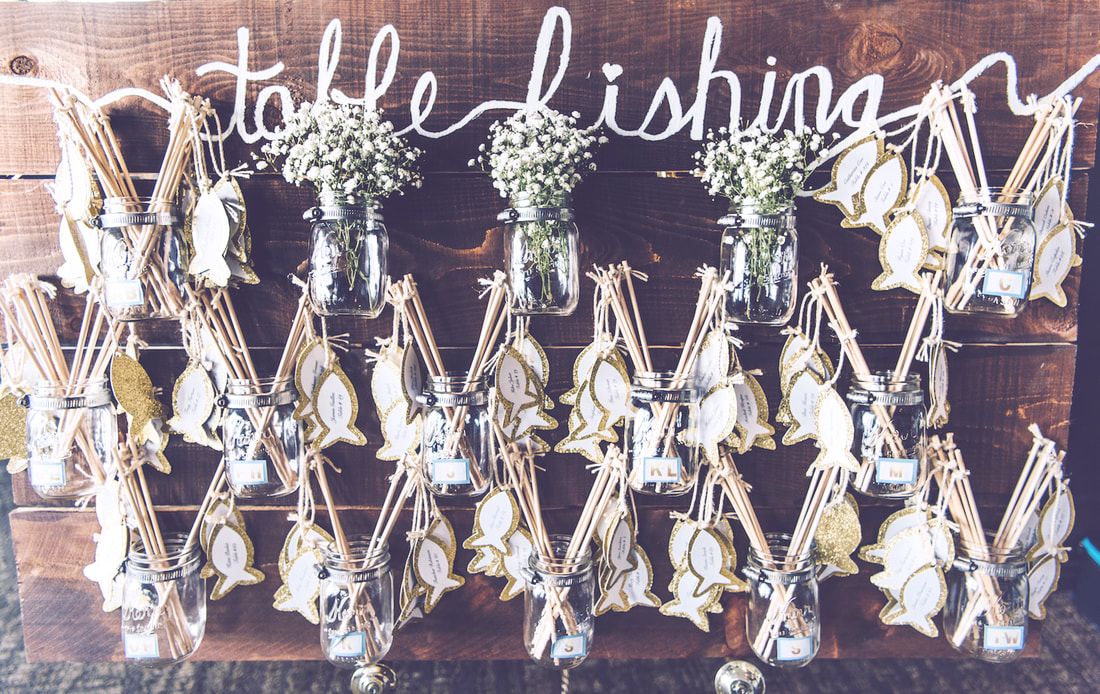
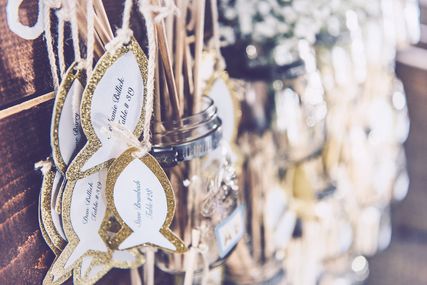
How to build a herb wall for your patio or balcony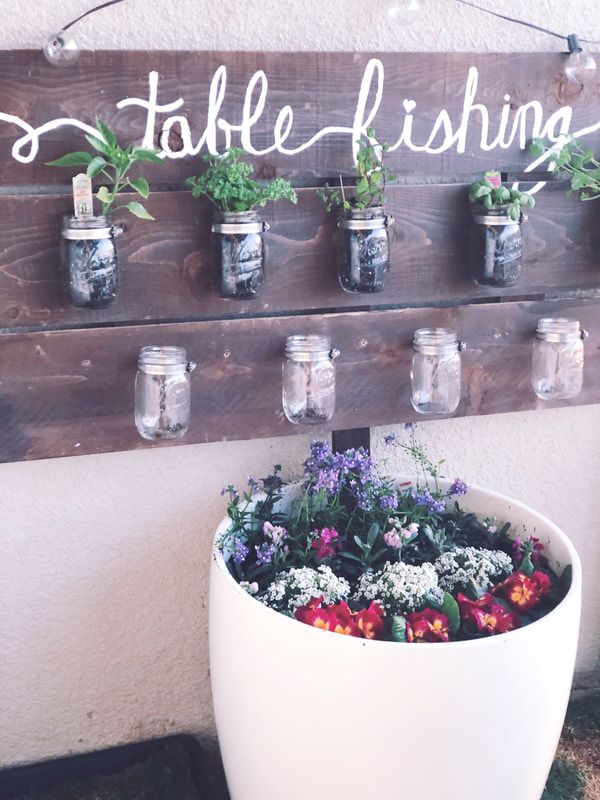 Many times, choices about wedding planning lean mostly on the brides preferences. So in an effort to incorporate my future husbands love of the outdoors into our wedding, we chose to have fishing theme hinted in the decor. As such, for our guests to find their table assignments, we had them go "table fishing".
As I made this board, nearly a year ago, I wanted a budget friendly option so used the friendly help of Home Depot to cut some fence pieces and show me where on earth to find pipe clamps (I think I walked the aisles for 10 minutes). With some nails and stainer (warning the "Honey" color is much darker than the golden color I was expecting, but it still turned out beautifully) in hand, I drove over to Michaels to get some $2.00 mini Mason Jars. That's it! I already had leftover white paint from the Dresser Makeover so with just about $70 worth of supplies I was ready. The sign was a huge success at the wedding and everyone enjoyed fishing for their nametags. Post wedding, the sign was put in storage and about a year later, when I finally had picked out my pot for the balcony, I brought it back out and re-installed the mason jars.  With another stop at the Home Depot gardening section, I picked out some mint, cilantro, thai basil, and curly parsley. The last one was supposed to be rosemary, however, once Brad saw all the other options there, he campaigned for some hot banana peppers so we added those in. I think picked out some flowers that do well in direct sunlight and partial shade. I was so excited to plant, that even in the 6pm winter (I now San Diego winters are still warm, but it was a bit chilly) darkness, I went and made my new plants feel at home. 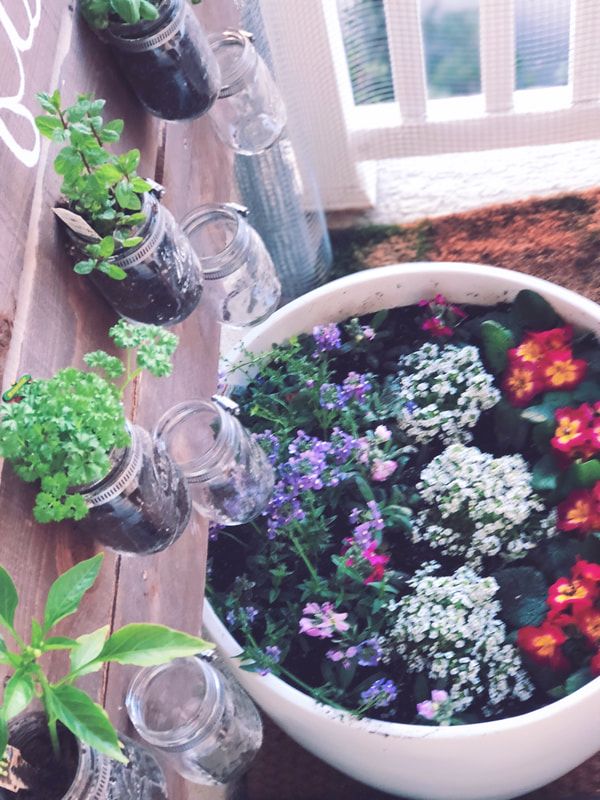 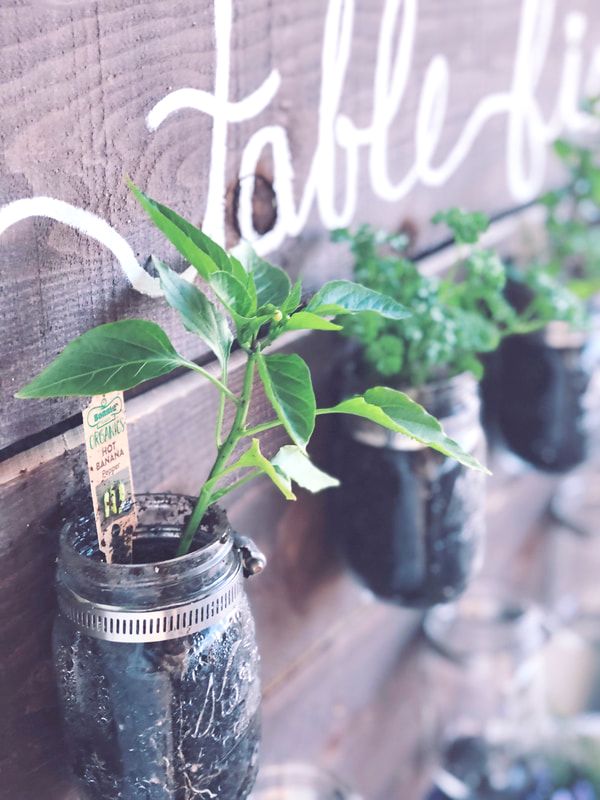 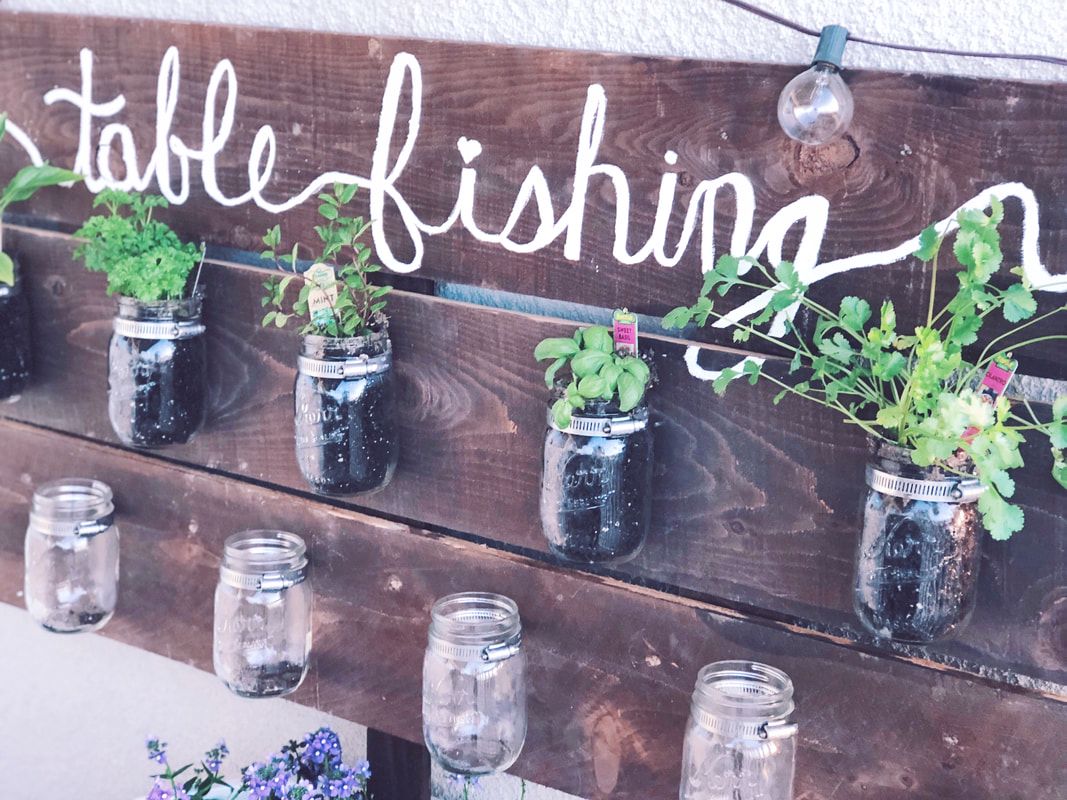 I'm so excited about how it all turned out. Not only was I able to re-use supplies from the wedding decor, I also got to add a bit of greenery and freshness to the balcony. Just goes to show that you don't have to have a big yard to put your green thumb to use. With a few tools and supplies you can create your very own modern farm to table herbs while adding unique decor to your space. Now off to enjoy a Friday mojito with some fresh mint :-) xoxo,Jessica
|
Archives
October 2019
CategoriesAll Accent Pieces Action Planner Basket Baskets Bathroom Bedroom Branch Floral Arrangements Bud Vase Candles Cherry Blossoms Curtains Cylinder Vase Decor Accents DIY Door Mat Family Flare Vase Floral Notebook Floral Water Bottle Flowers Flower Wreath Flower Wreaths Furniture Gifts Greenery Guest Room Home Home Decor Indoor Plants Jeans Living Room Mirrors Narrow Neck Vase Nightstand Outdoor Living Pastels Personal Development Productiity Rugs Seat Cushions Shelf Decor Shower Sneakers Spring Spring Decor Spring Ideas Storage Ideas Style With Time Styling Tips Sunglasses Table Lamp Throw Blanket Vase Vases |

 RSS Feed
