before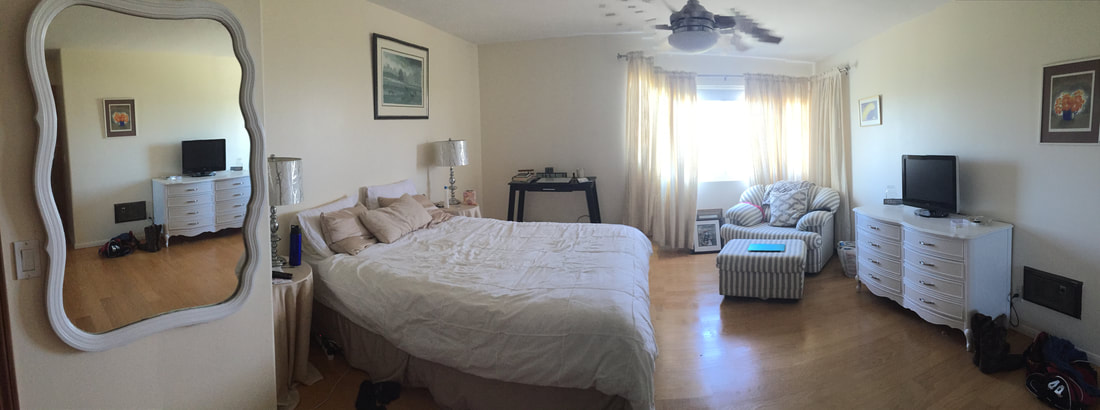 after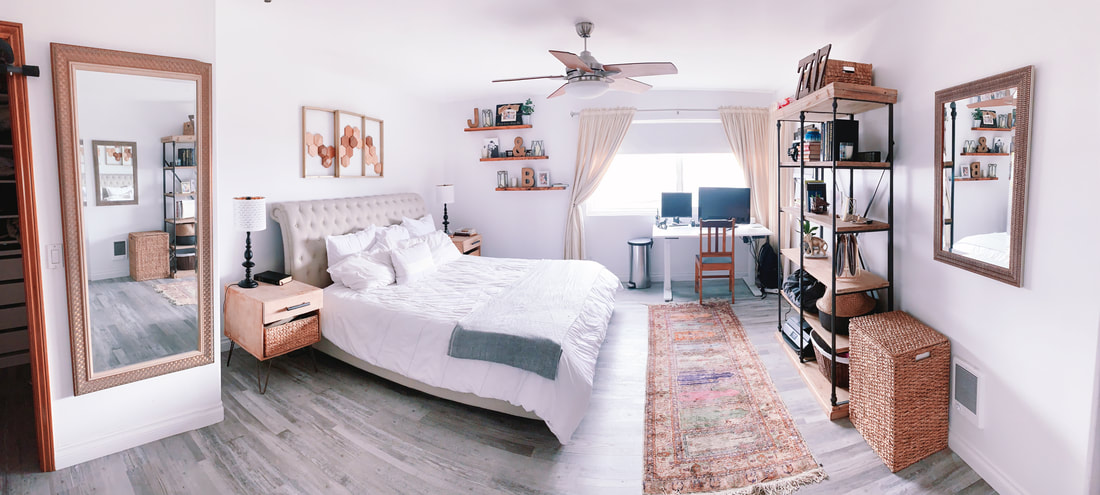
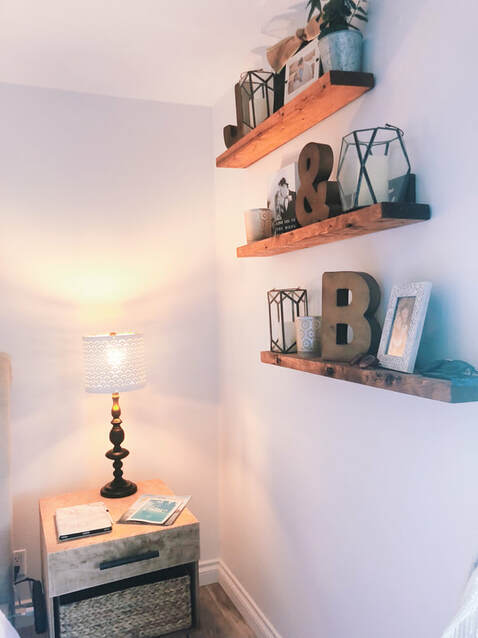
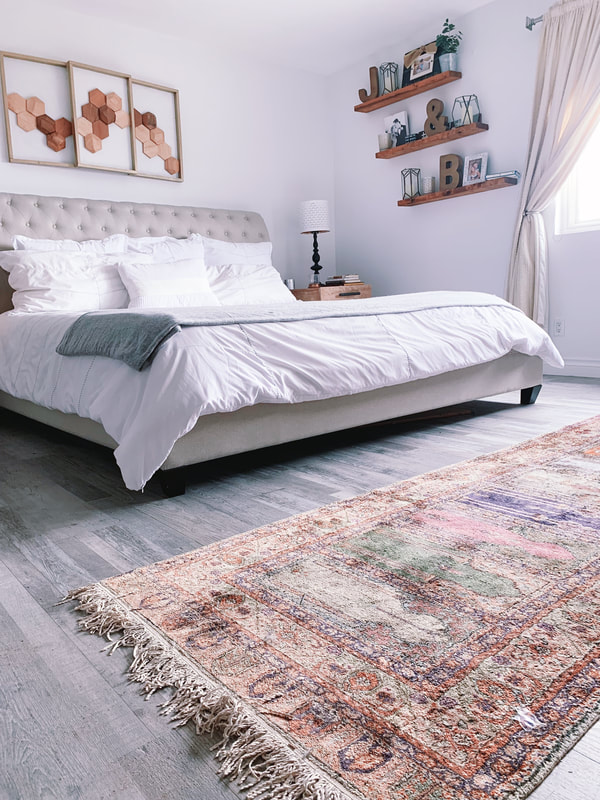
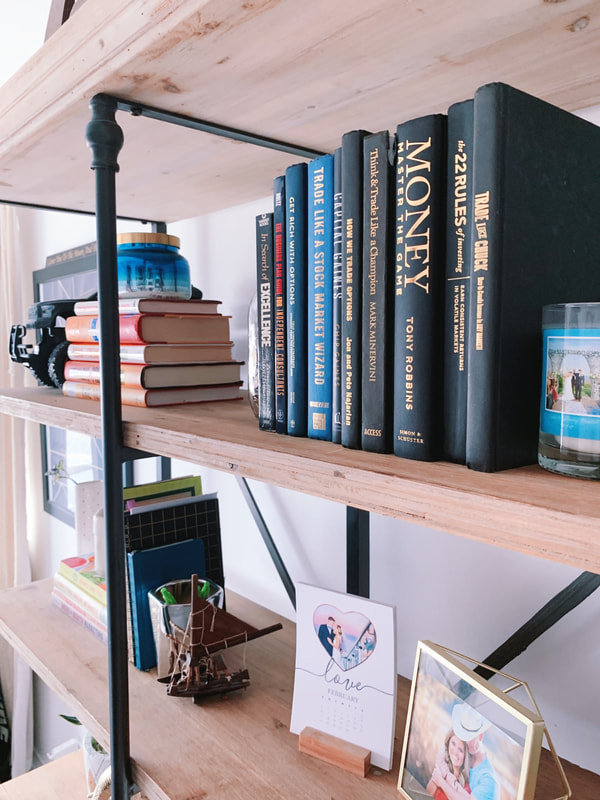
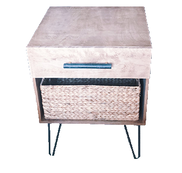
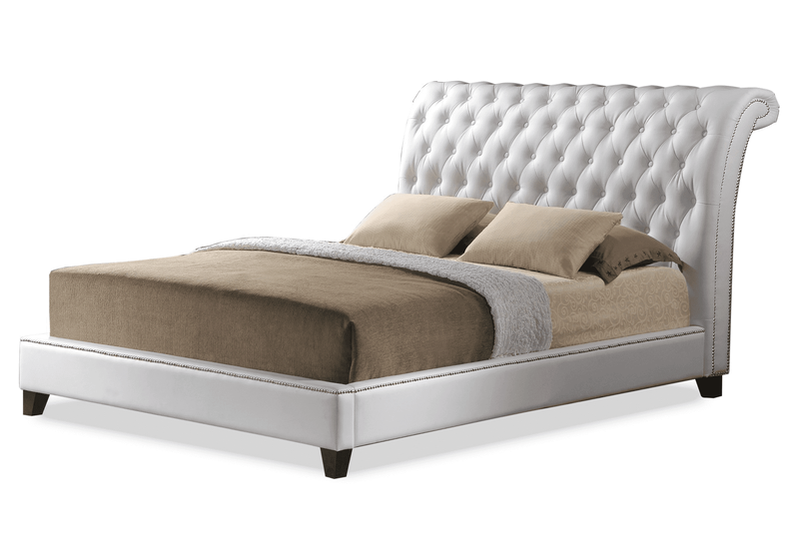
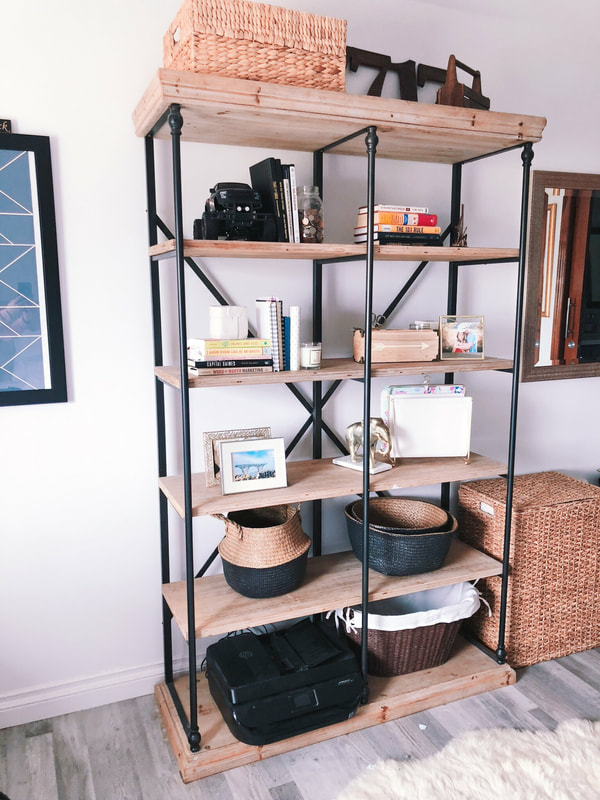 This post has honestly been a long time coming! And the reason for that is the foundational mission of Beyond the Clock which is to style with time. I have had a vision for our master bedroom for probably almost 3 years. It took savings and slowly moving things around, upgrading furniture pieces and styling with the perfect details that I gathered throughout the years. I know a lot of you followed along the way as I put these together and now is the big reveal of the full master bedroom transformation! The thing is, as much as we would all love to click our heels together and transform a room instantly, one of the best things about styling a room is seeing how things come together. It helps both on a budget perspective, but also as an organic way for things to fit together and evolve as your day to day changes as well. When I first began getting inspiration for the room, we had an office. Shortly into starting the room, we changed that into a guest room and had to find a place for some of the office furniture. With a bit of rearranging, we brought the bookshelf into our room since we don’t really watch TV there and then moved the TV stand to the living room. It ended up being a great way to refresh all 3 rooms and make good use of the space for how we were using it. So here is the big reveal, all items and DIY upgraded projects linked. My curtains and rug are family heirlooms but I linked similar ones for you guys. Thank you for stopping by the blog today! Hope you all have a wonderful weekend. Make sure to CLICK HERE and subscribe so you never miss a post or giveaway! UPDATED: Style with Time - Bedroom, the complete guide for styling a room overtime to fit your style and budget.
P.S. Don't miss out on bonus tips and content by subscribing to the newsletter. CLICK HERE to learn more.
2 Comments
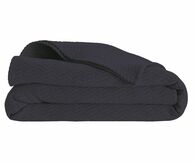
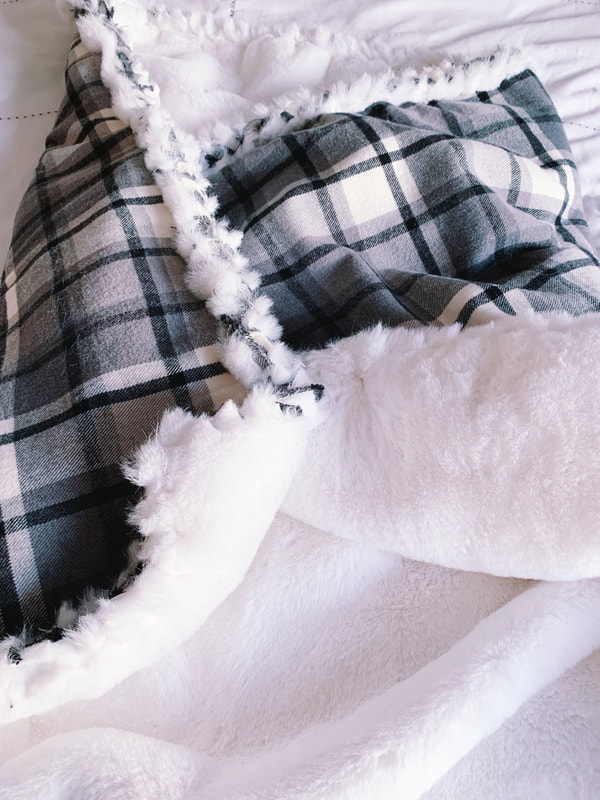
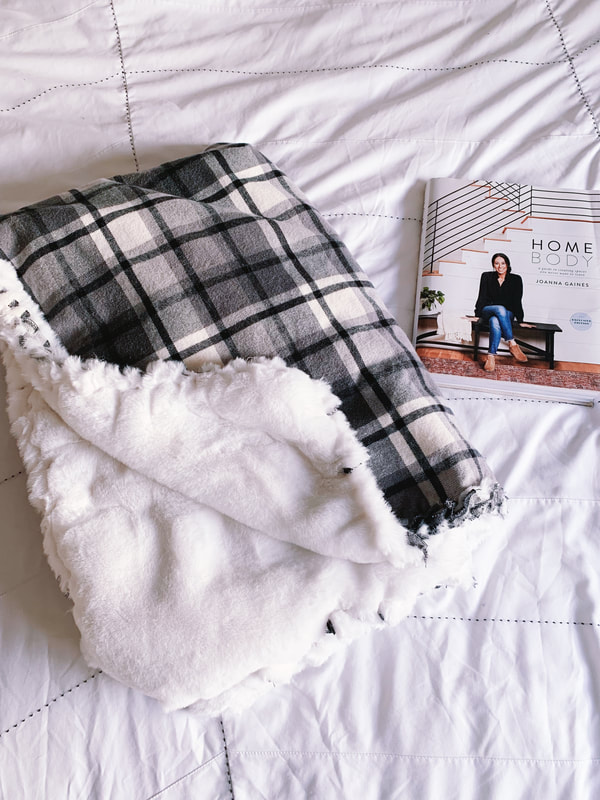
1/30/2019 3 Comments DIY No Sew Blanket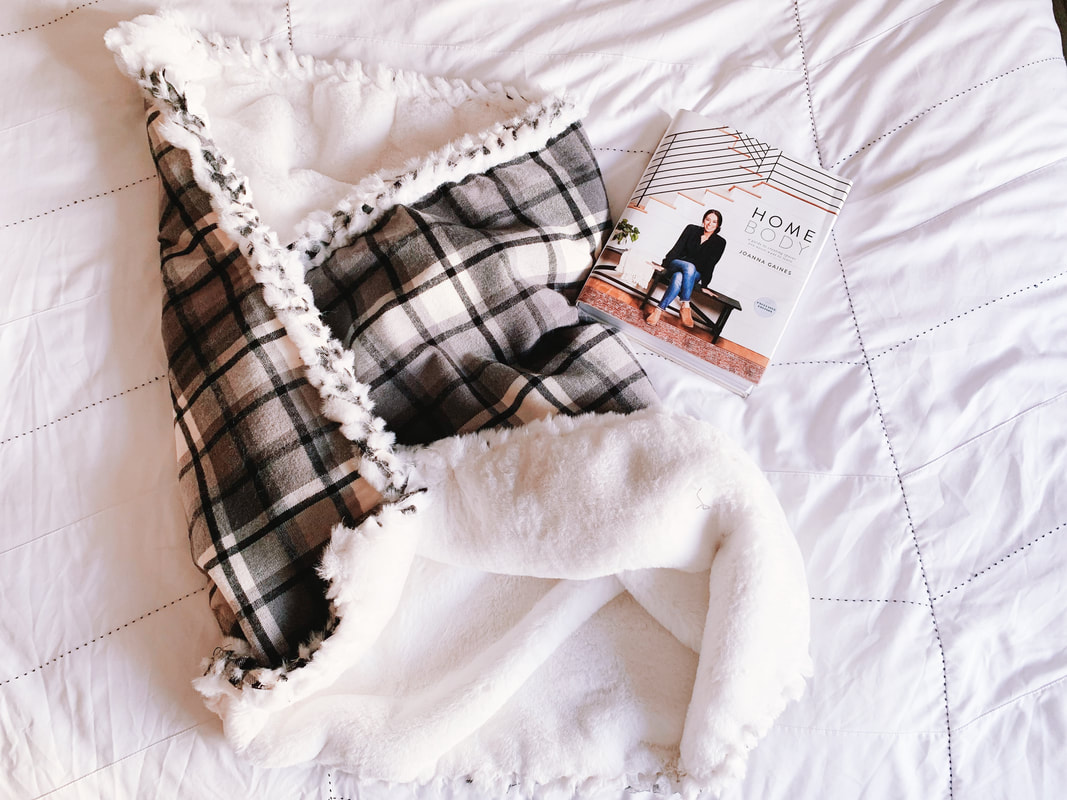
These last couple of weeks have been extra cold around here. I feel like I’ve been walking around the house like a marshmallow with all the layers of clothes and a permanent cape from the blanket that I drag from room to room. Brrr, I love wearing boots outside, but I’m also ready to start getting a tan back. A couple weeks ago, I talked about a great gift idea with a DIY blanket and today I have the full tutorial for you. Supplies
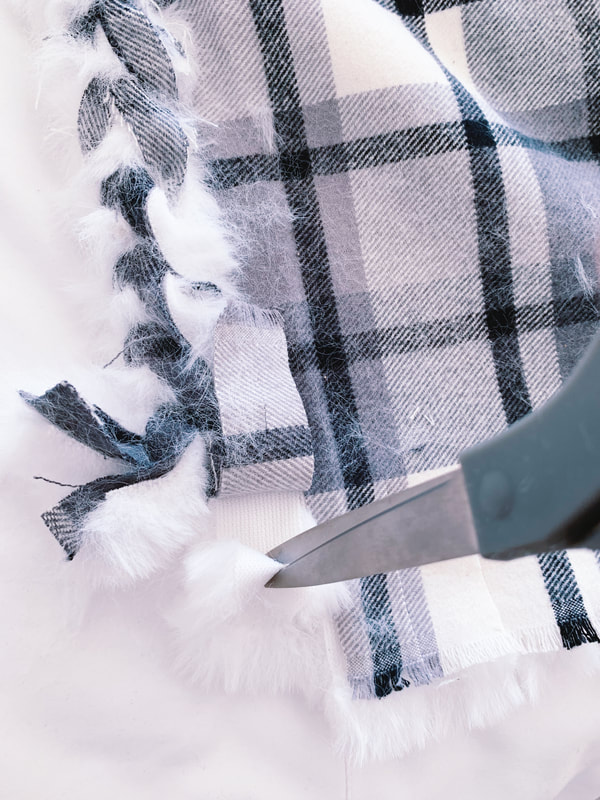
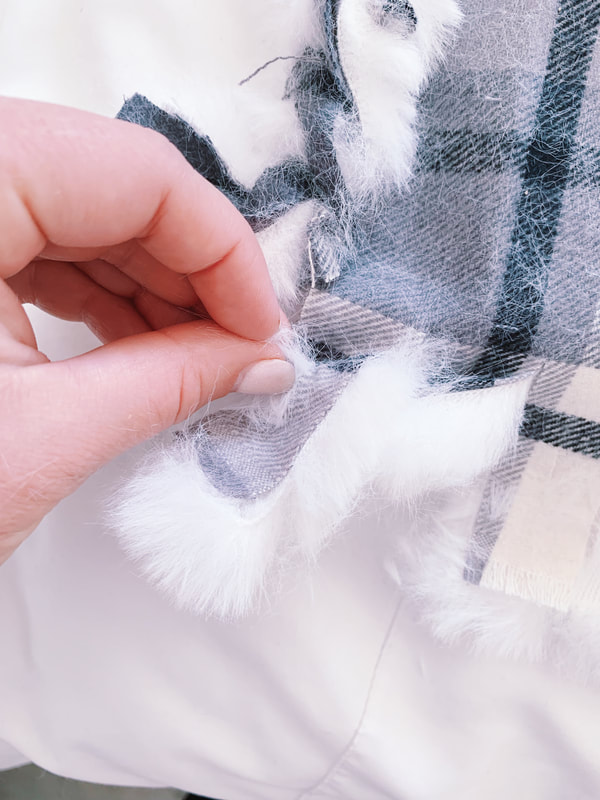
How To:1. Lay the first piece of fabric face down over a large surface. (My dining table isn’t big enough so I did it on the bed) You want the side of the fabric you want people to see facing down. 2. Line up the second piece of fabric face up, directly on top of your first piece of fabric. This time, you want the side of fabric that you want people to see facing up. 3. Trim the edges so that both pieces line up exactly. 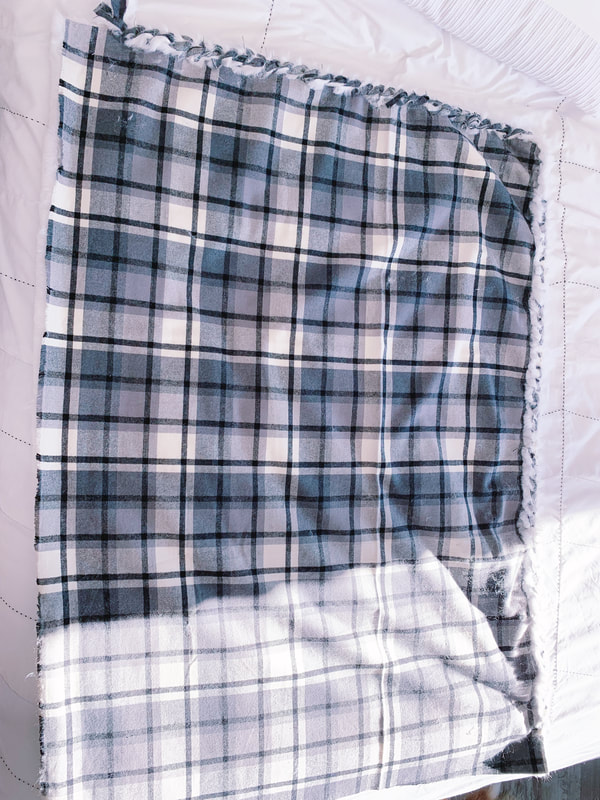 4. Start with one side and measure 2.5 inches in and make your first cut the 2.5 inches up into the fabric. 5. From the first cut measure 1.5 inches horizontally and then make your next 2.5 inch vertically. Keep going with the same pattern along each side. At each corner, you will cut a 2.5 by 2.5 inch square out.
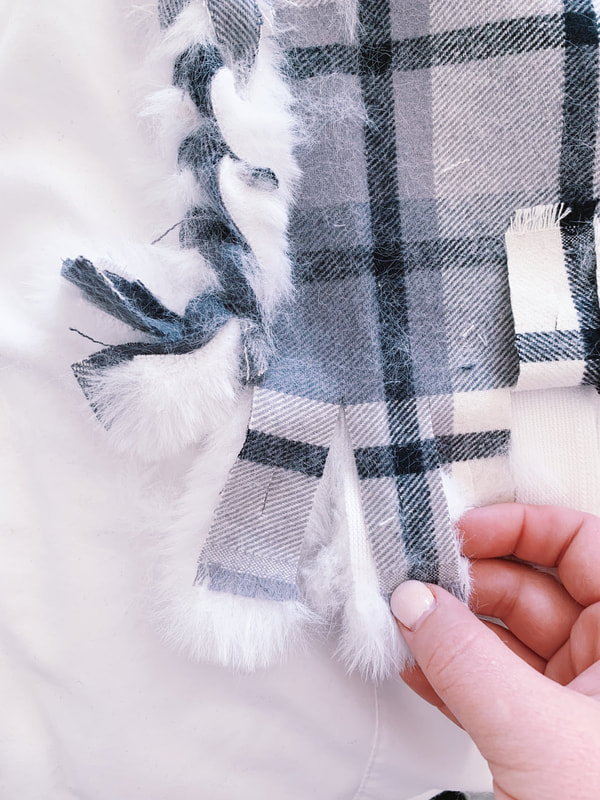
6. Next up comes the finishing details. You can keep it super simple and just do a not between two pieces, I’ve done that in the past and it is really easy to do, but sometimes looks a tad sloppy. So this time I tried the braided finish and really love how it turned out. 7. On each set of cut pieces, fold the piece in half and cut a whole about 0.5 inch long. 8. Take the set from the right side and thread through the hole on the left side and tighten. Towards the left.
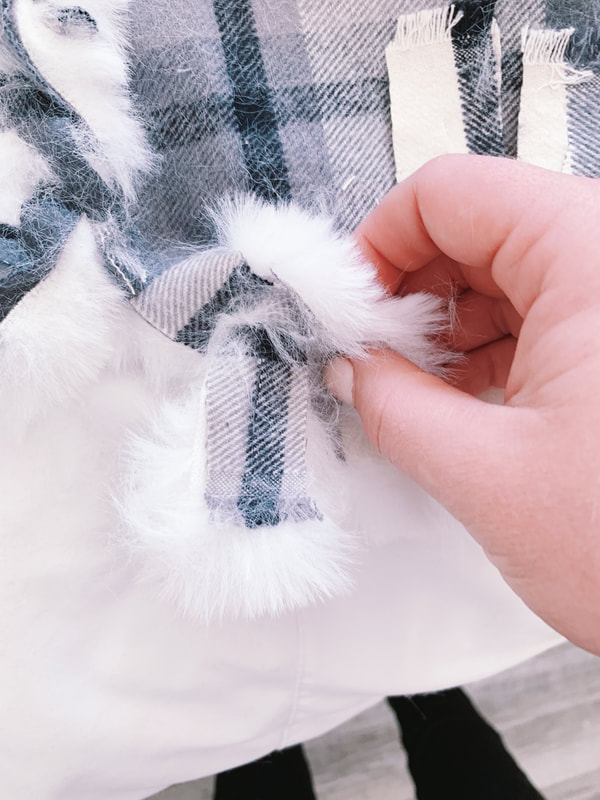
9. Keep doing that all the way around, even with the corner pieces. When you reach the last piece, tuck it into the first whole and by wrapping one piece of the edge through the whole and tying a small knot underneath with the second piece. 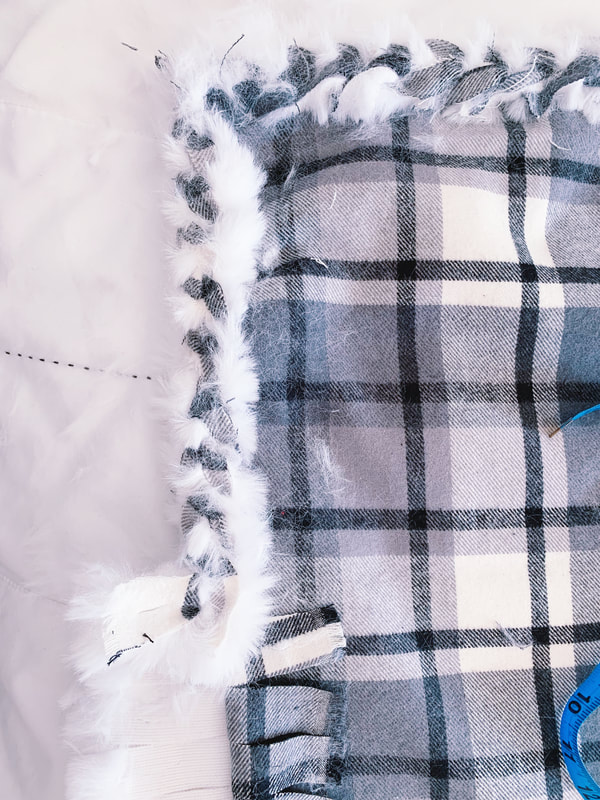 There you have it. This is so easy to do and a great activity to do with kids too while you are bundled inside during winter storms. I’d love to see what you guys come up with. Try it out and be sure to tag @beyondtheclock or hashtag #btcdiy. Can’t wait to see the fun you have! xoxo, |


|
|
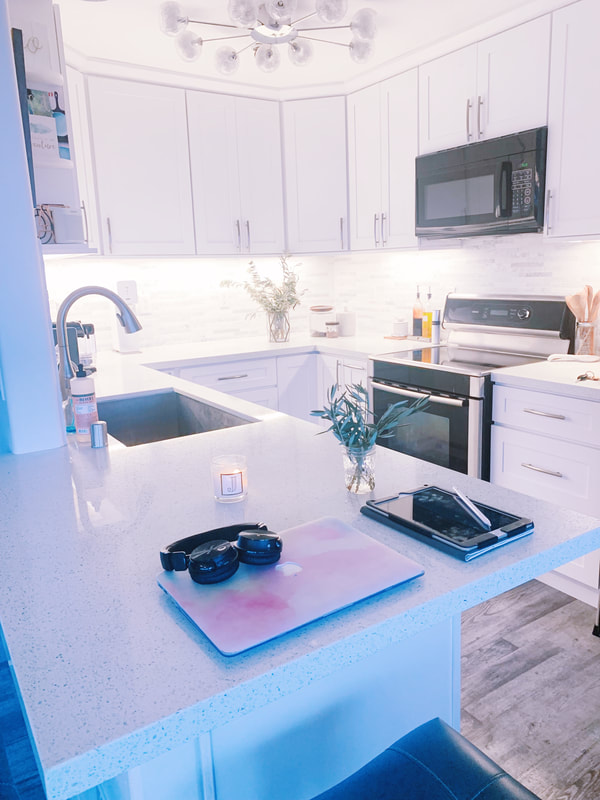
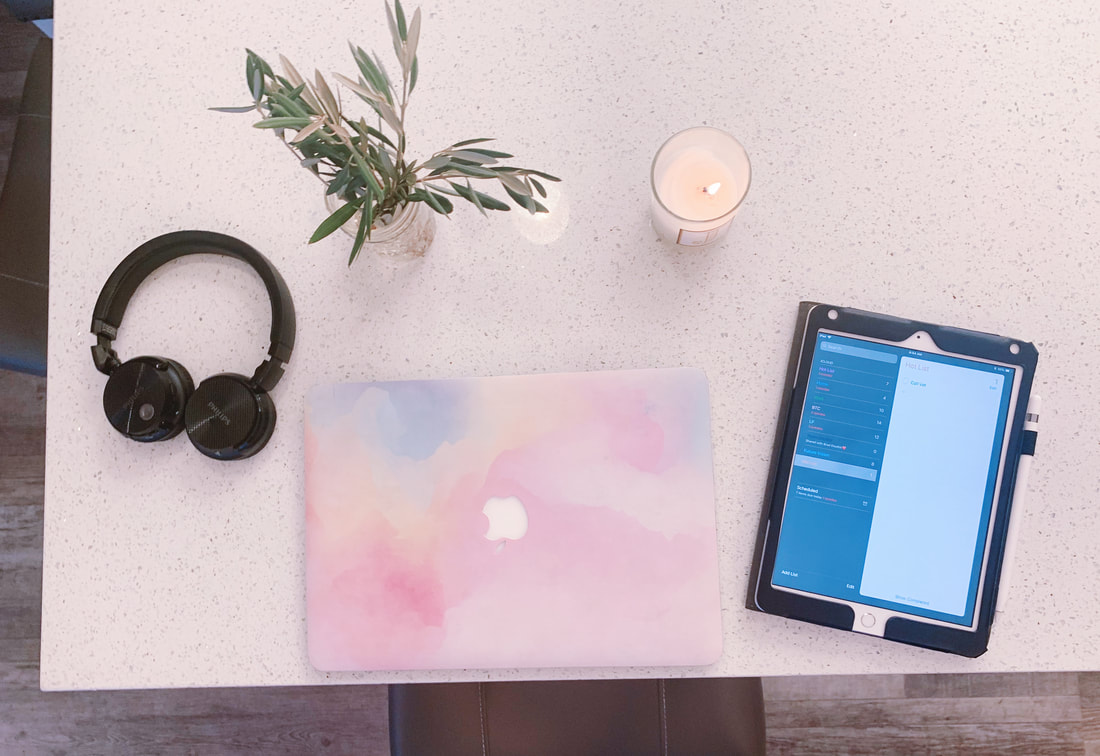
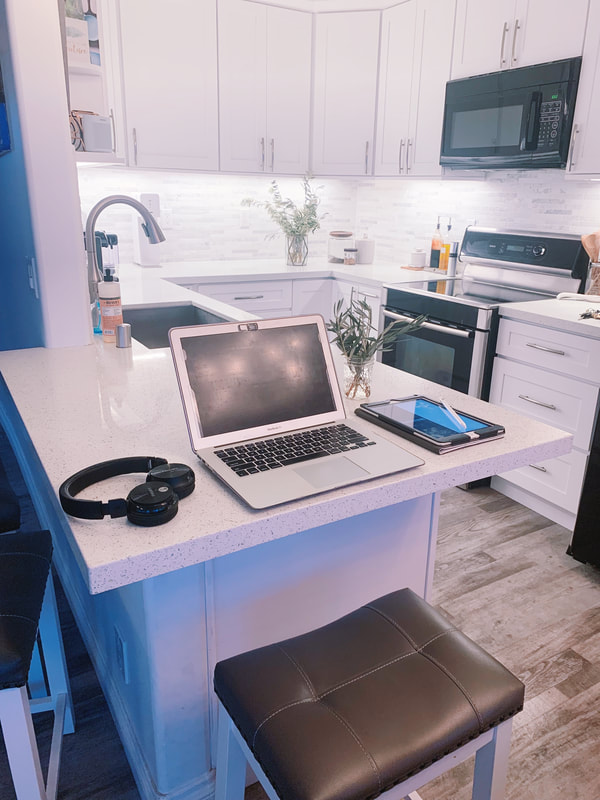
Do you ever walk into a room with the intention to sit down and get something done, only to be met with eight thousand distractions? It’s truly amazing how fasts our minds work, sometimes to our own demise. There are so many times I walk into my kitchen, which I use as my office, to knock things off my to-do list, but instead I end up wiping down the counters, making my shopping list, taking things back to their rightful homes or worse, find a magazine I left in the corner last week and flip through my favorite articles. Ahhh the distractions are so real!
I’ve been really trying to make a conscious effort lately to find focus during the dedicated moments and keep my space and mind in a place that allow for productivity rather than floating to the next fancy thing in my line of sight.
Here’s what’s been working for me:
I’ve been really trying to make a conscious effort lately to find focus during the dedicated moments and keep my space and mind in a place that allow for productivity rather than floating to the next fancy thing in my line of sight.
Here’s what’s been working for me:
1. Make a dedicated space
- Whether you go into an office or have a space at home, make sure you have a designated location for “focus time”. If you online shop in the same place you need to be paying bills, your brain will naturally pick the fun stuff first.
- If you are like me and don't have a dedicated space (I use my kitchen counter) then find focus by mixing up your posture or direction when it's time to hammer things out. Whether it be standing vs. sitting or facing the center of the room vs the wall, switch up your body and view for doing things that require less focus. If you chat in the office, see if you can stand for the social times and sit for the focus times, or even walk over and socialize near the coffee pot instead of right at your desk
2. Keep the space clean
I don’t know why this is so much easier said than done, but it is. As hard as it is to keep that designated space clean…DO IT. Before you leave for the day, put everything back in it’s place, take the dishes away, maybe even wipe it down with a Clorox wipe. A clean space helps keep the distractions to a minimum. You may still have the virtual ones, but at least by doing this, you are eliminating the physical ones as best as possible.
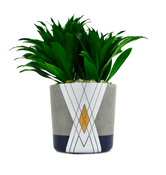
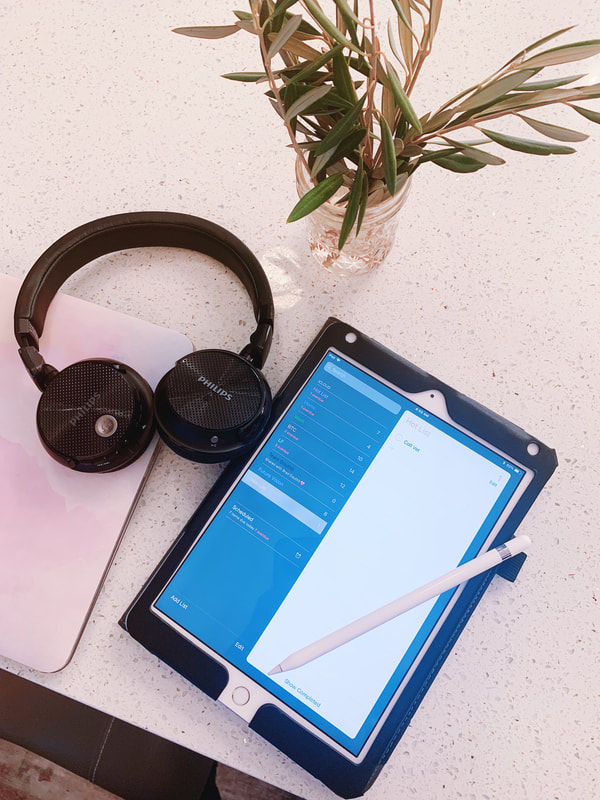
3. Add a plant
Not only does it look super cute, but it’s been proven that plants help with stress relief. Keeping something low maintenance like an air plant or succulent can help both you and your co-workers find a little comfort and channel the right side of your brain.
4. Keep a "hot list"
I like to use the Reminders app on my phone that integrates with my computer for this. The purpose of a hot list is to help prioritize things you must get done TODAY.
I generally keep 3 or 4 to-do lists for key areas of my life. Home, Work, Little Foodie, and Beyond the Clock. I found myself getting super overwhelmed about all the things on my list. Most days it felt like it was growing exponentially, and I was only getting 1 or 2 things off my list. I started to take the top 3 things off of each list and prioritizing those, but even that seemed like a tall task. I was getting more disheartened that I couldn’t get 3 from each list off a day.
That’s when I tried the hot-list. Each evening, I go through the lists and prioritize something that absolutely must get off the list from each category. Normally it’s 3 items from my work list and 1 item from each of my other lists. Best of all, with the reminder’s app, you can right click and move the task over to the hot list so after I have done my prioritization, I only see those 6 things in the morning.
The list is much less overwhelming looking at 6 rather than 16 per list. My mind is able to mentally prepare and commit to accomplishing them that day which keeps all aspects of my life moving forward.
I’ve spoken to so many of you who have big dreams whether it be for a specific project, your career or next big purchase. I know from my own experience, staying committed to them can be hard, especially with the ten million other things going on and/or a day filled with Netflix and cookies only. I’m right there with you. The good thing about us as humans though, is we are able to form habits that can enable big things to happen.
I’d love to hear some helpful habits that are helping you guys stay productive and focused? Drop a comment for your favorite tool, app, desk décor or other that keeps you going strong.
I’d love to hear some helpful habits that are helping you guys stay productive and focused? Drop a comment for your favorite tool, app, desk décor or other that keeps you going strong.
xoxo,
Jessica
12/13/2018 0 Comments
DIY Candles with Momma Pots
 RSS Feed
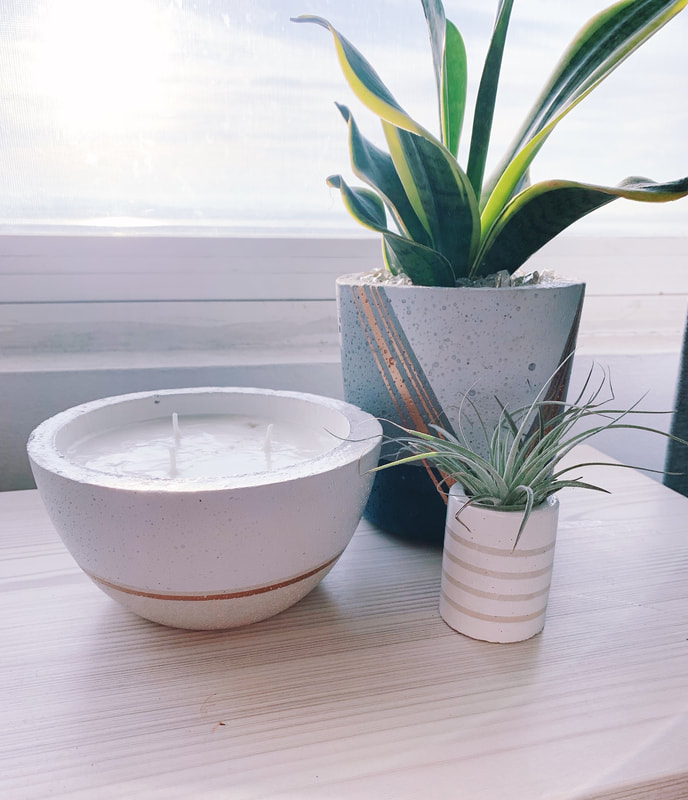
 Melting the wax |  Placing the wick |
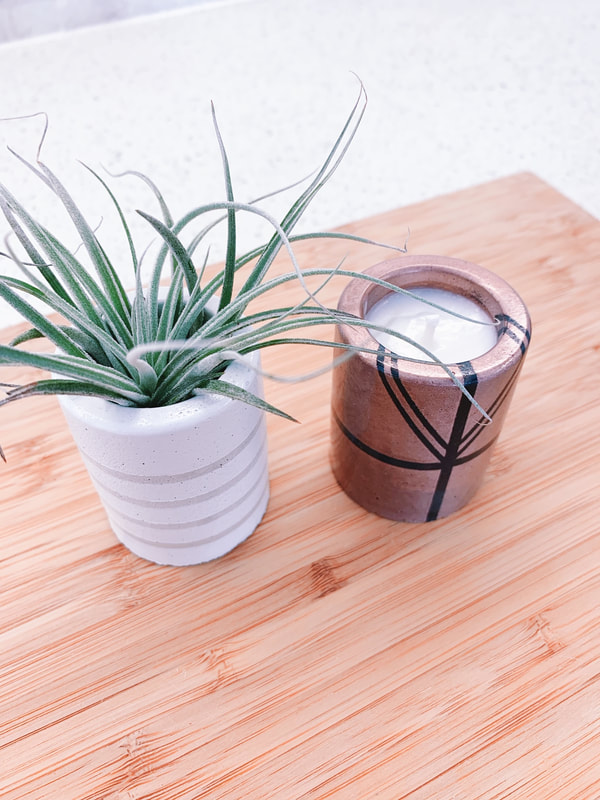 |  |
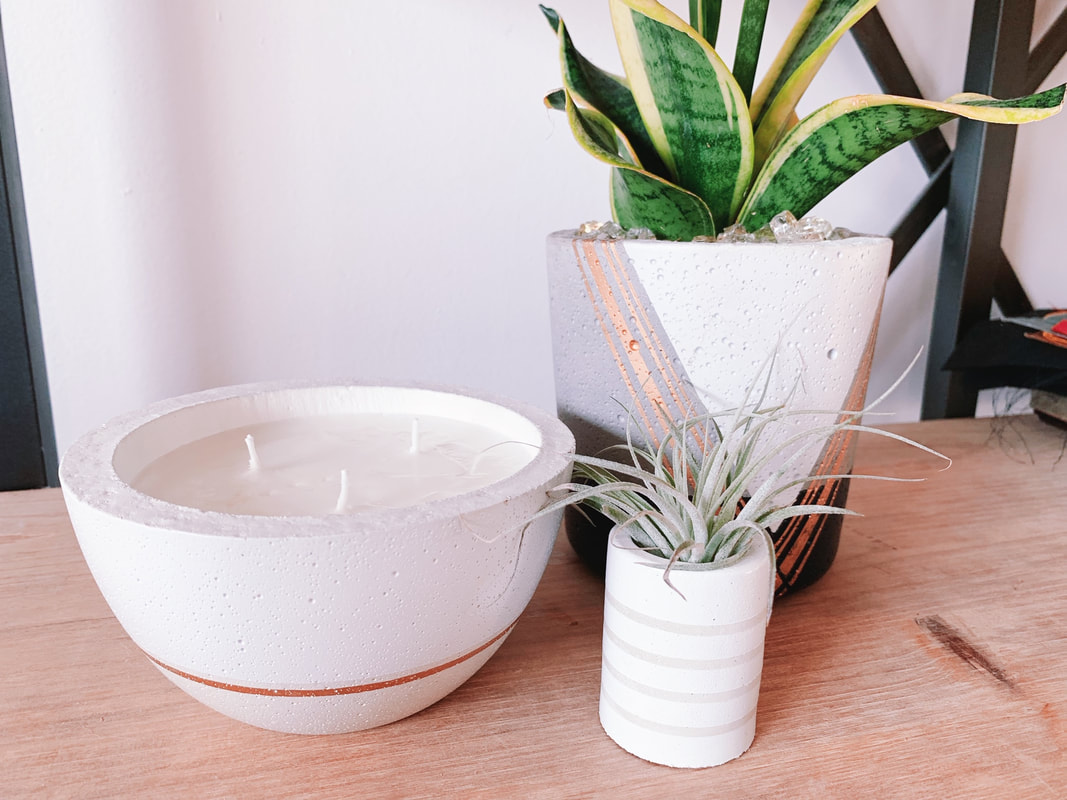
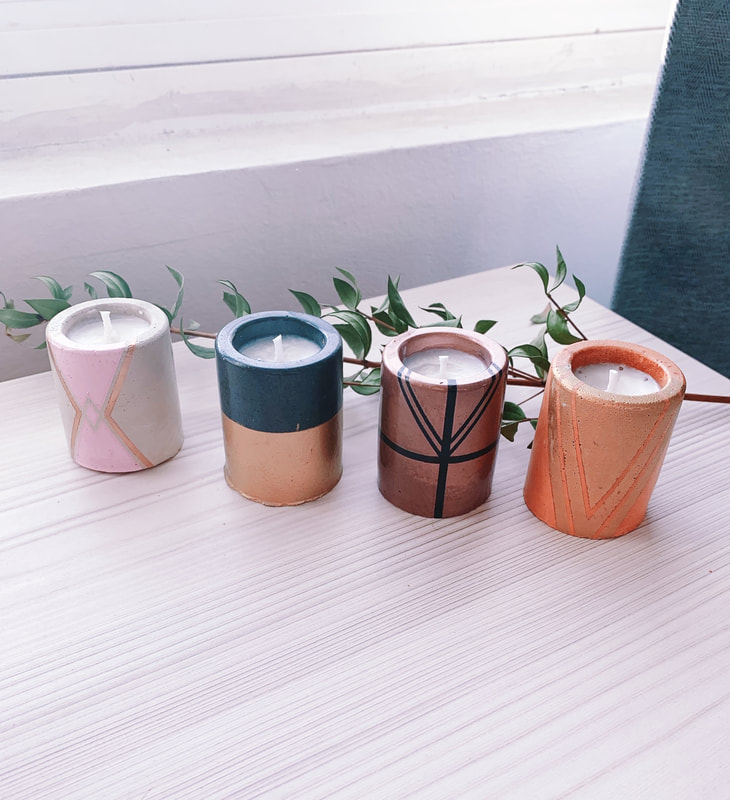
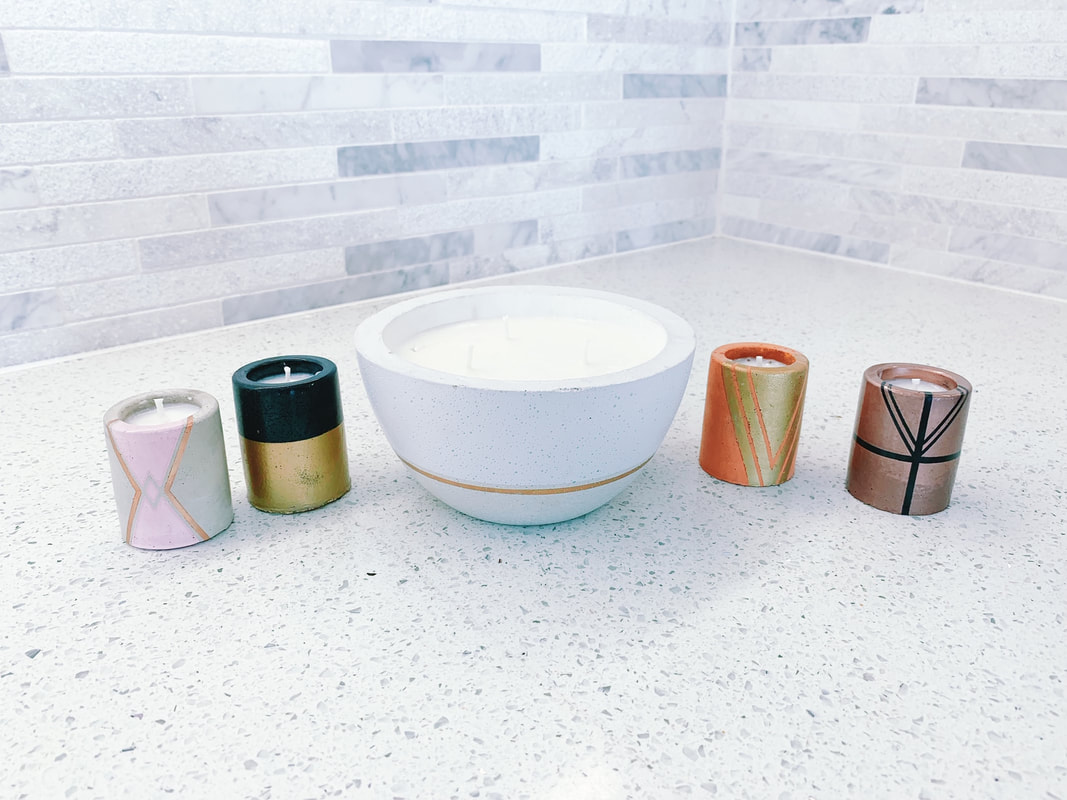
If you’ve been following me for a while, you know for sure that I am basically obsessed with candles. I just love how the perfect scented candle can refresh a space with a glow that melts stress away. I remember as a kid making candles at a birthday party and thought, why not try it again this holiday season as a fun gift for both myself and others. To help make it extra special, I teamed up with one of my absolute favorite local San Diego businesses that specializes in modern pots for the candle holder, Momma Pots, This way you can get a two for one out of your gift, once the candle burns out, you can pop out the wax and add in your air plant for a gorgeous accent to any space.
Shopping List:
Wax
Wick
Essential Oils
Momma Pots
Double Boiler/Pouring Can
Thermometer - I just used one I had in the kitchen but you could always grab one from Amazon if you don't have.
Toothpicks
Tape
Wick
Essential Oils
Momma Pots
Double Boiler/Pouring Can
Thermometer - I just used one I had in the kitchen but you could always grab one from Amazon if you don't have.
Toothpicks
Tape
How to:
- Prep Pots - Take a damp paper towel and lightly wipe out your container. Let dry for about 5 minutes. Use double stick tape and place a small piece underneath the metal bottom of the wick. Place the wick in the center of the container and use a pen or pencil to gently press the wick down into place.
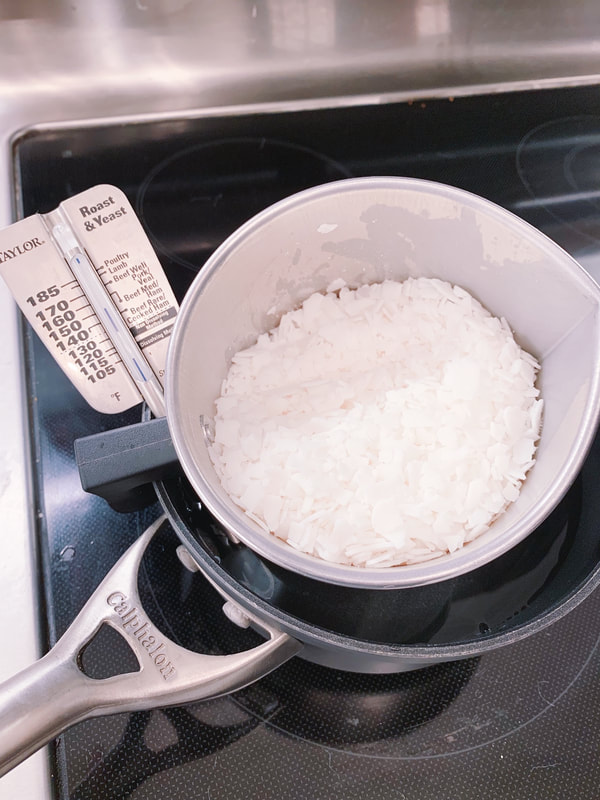
- Melt - Add about 1-2 inches of water to a pot and place on the stove over medium heat. Add your second pot/container for your double boiler and place the thermometer in the water to measure the temperature as the water heats up. Add wax to the second pot/container (1 cup of dry wax fills about 4-5 Momma Pots shooters). Keep the heat between 120-170 degrees Fahrenheit. Remember that wax is highly flammable so you want to ensure you don't get it too hot as you are working with it.
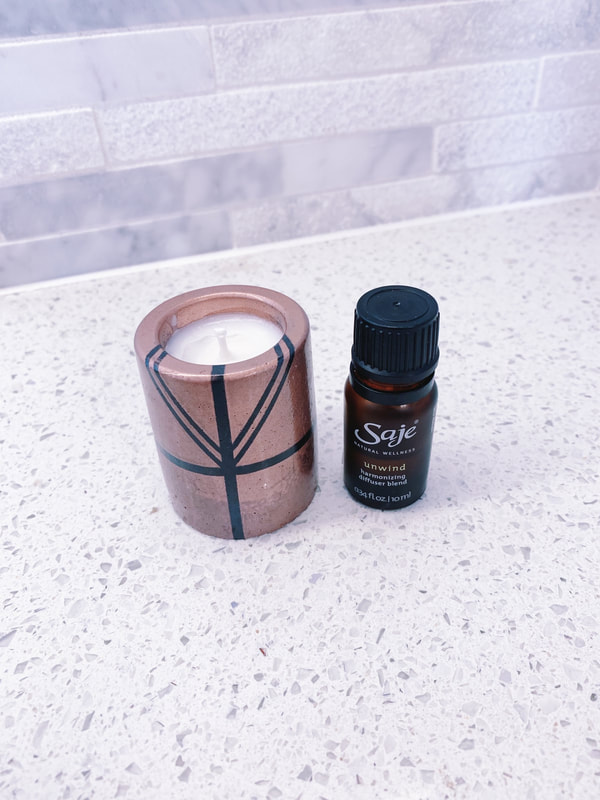
- Scent - Once your wax is completed melted and you have no "white chunks" left, remove from the heat and add you scent. I really wanted something that was relaxing and had some holiday vibes to it so I chose the Unwind collection from sage. I used about 50 drops per 1 cup of wax but you can adjust to have a stronger or lighter scent according to your preference. P.S. The house smelled AMAZING while making these. The scent is stronger during the making process then when you burn it later so just keep that in mind when you think of adding more./less.
- Pour - Gently pour your wax into the container. Make sure to take it slowly so that you don't overfill. Leave about half a centimeter of space between the top of the container and the wax top.
- Center Wicks - A lot of videos wrap the wicks around a pen or pencil and balance that across the width of the container to center the wicks. I didn't want to wrap them and disrupt the wick too much, so instead I made a toothpick contraption to hold them center. Just take two toothpicks and hold them parallel right next to each other. Take a piece of tape and wrap it around the edge of both toothpicks on one side. This will make them a bit like chop sticks. Take the untaped side and slide it around the wick, centering it in the pot and then place the taped side on the edge, adding extra tape to the edge to reinforce it as a holder.
- Cool - Let the candles cool for a few hours, 24 hours would be ideal. You will notice the wax turns from liquid to solid and from clear to white. Once cooled, trim the wick to about 1 cm above the wax top. Remember to trim a wick often to keep you candle fresh.
- Pair - To complete your gift set, pair your candle with a cute set of matches and an air plant for down the line.
I'm so excited about how these turned out and can't wait to do it again with some new scents. Do you guys have any favorite essential oils you would try?
xoxo,
Jessica
10/29/2018 0 Comments
The Ultimate Pumpkin Carving & Decor
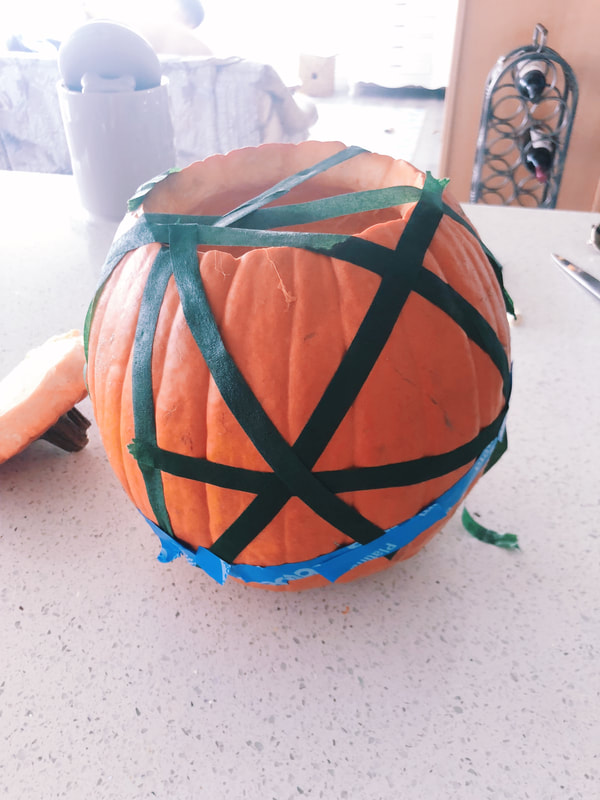 |  |
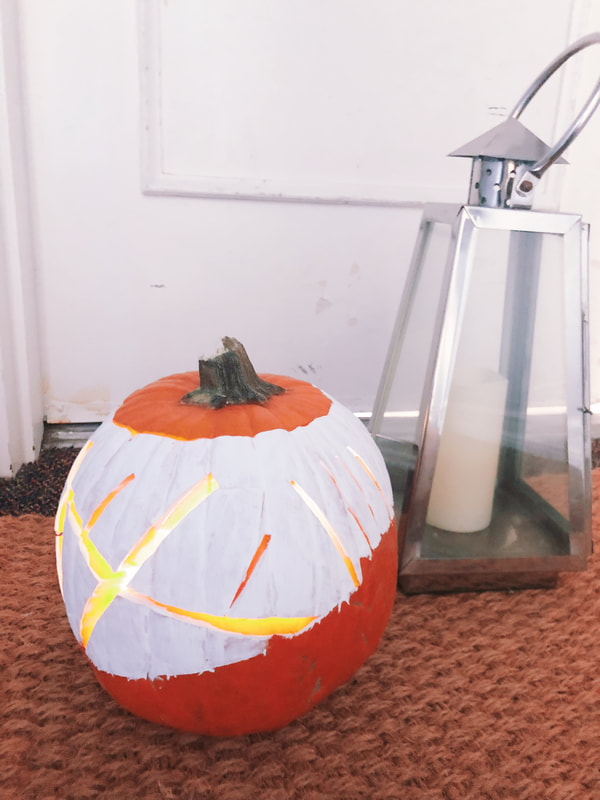
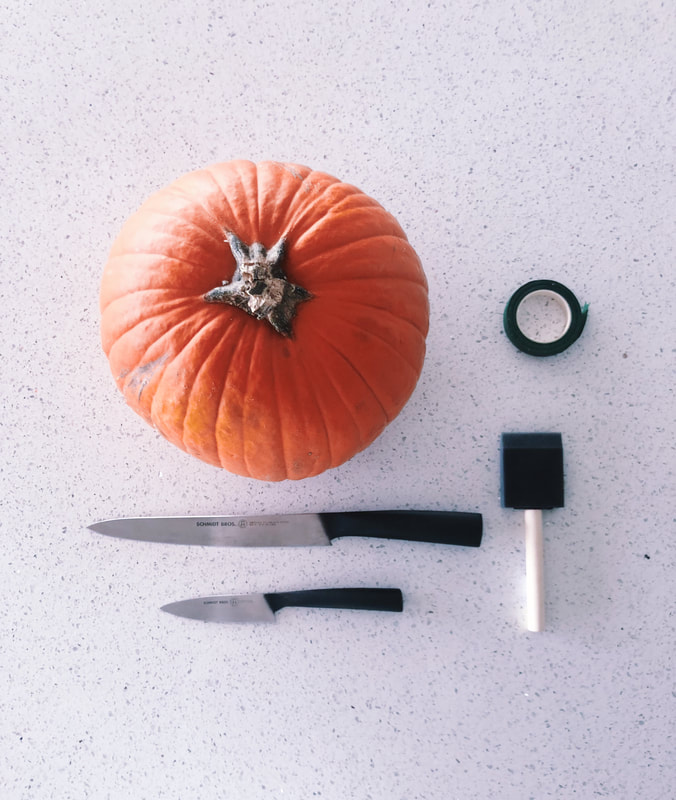
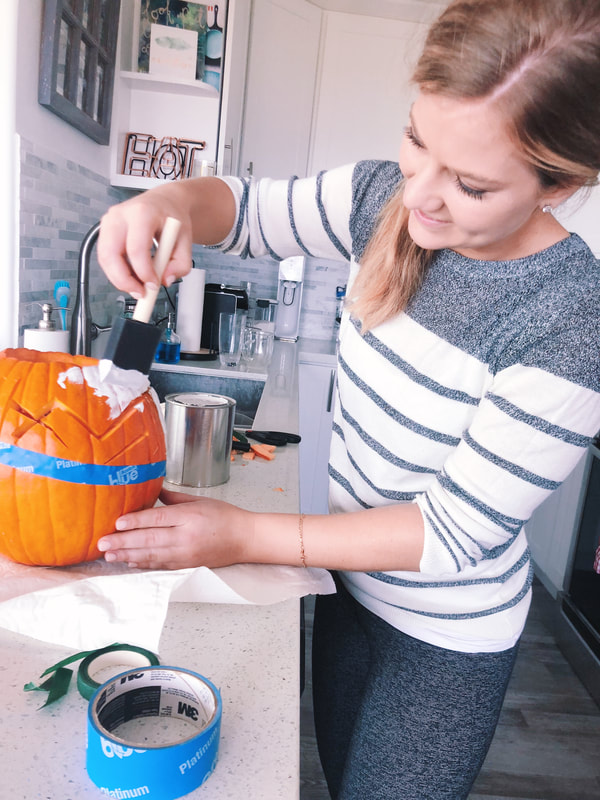
It's been a few years since my husband and I carved pumpkins, but we always have the best time. No matter what I'm doing, I always think about the entire experience rather than just the one task to be done. (In college I had a dream of opening a dermatology clinic with manis, pedis and champagne in the waiting room. I know I know, today that's a medspa, but it was my "complete experience practice" at the time). Anyways, I took the same approach to pumpkin carving this year and have some of my best tips for the ultimate pumpkin carving experience plus how to make your pumpkin a work of art.
- Print or Sketch it out – whatever pattern I'm working on, a logo, a face, a shape or animal, I always google "simple [fill in the blank]. This year I wanted to do some fun geometric patterns and looked online for inspiration before taping off the pumpkin.
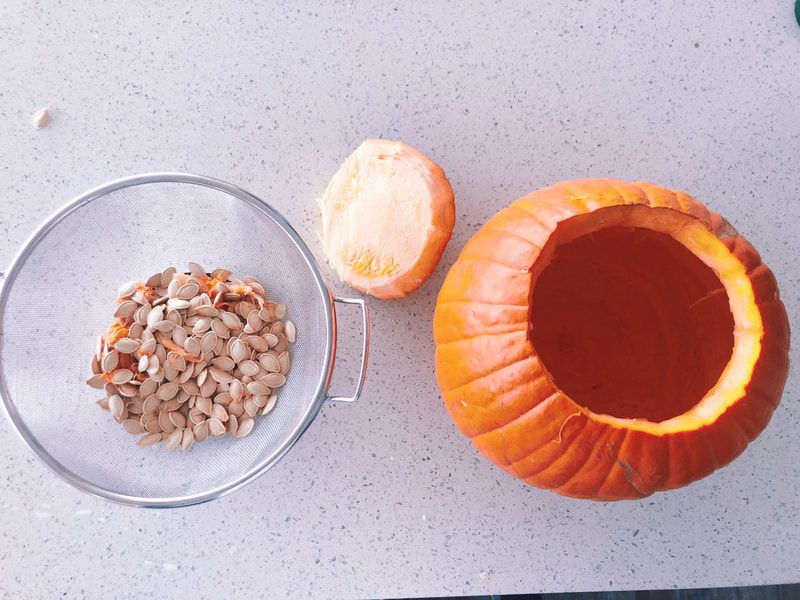
- Spoon it out - I've found that you definitely don't have to purchase all the fancy carving tools. A few helpful home essentials like your chef knives and a good tablespoon do just as good of a job.
- Paint - Orange has never really been my favorite color, so I love to paint the pumpkin with white or metallic gold to add a fun flair.
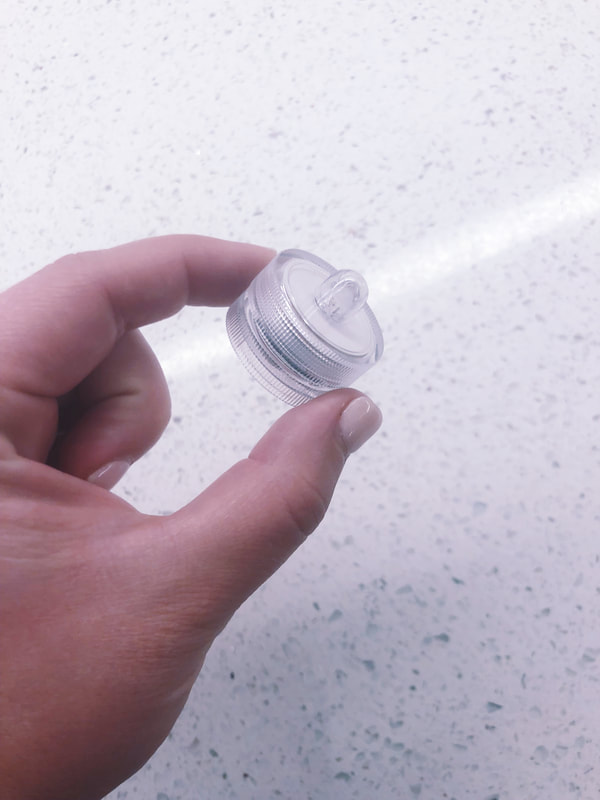
- LED candles - These are great because they are battery operated so you can leave them on and they are also waterproof so once you are done with the stinky pumpkin, you can wash them up and save them for next year or another project!
- Keep the Seeds for a healthy snack – stay tuned for the recipe in the next blog post.
10/10/2018 0 Comments
How to Organize on a Budget
When I scroll through Instagram and see how people have organized their pantries or refrigerators, my eyes normally widen, my mouth drops and my brain starts to dream of all things container store.
I feel like organizing any closet, pantry, or area of the house can become overwhelming. I recently decided to organize the hallway closet. Since we don't have a garage, this closet is filled with items like paint cans, power tools, and other more rugged accouterments. It is also a media closet filled with DVDs, books and photo albums and on top of all that, it also has a few "miscellaneous" things (aka junk closet).
I knew I needed to clean it out (it had been way too long) but I also had that feeling, you know the one where you know you need to workout but don't want to. It was the same dread, but once I got started, I started finding things I had forgotten about, categorizing similar things and envisioning my clean and crisp future closet state.
To help you all not have the same overwhelming feeling that I faced at the beginning, I put together my quick and easy tips to organize your closet on a budget.
1. Empty
The first step in every organization project I do is to empty everything out. It may look like a hurricane has just gone through the hallway, however, it also allows you to see and find all the items that were hidden in corners and enables you to see the full space you have to work with.
2. Batch
While I am removing everything, I start to form piles of similar like items. While I was going through the closet, I found 7 different sunscreen sprays. Although this was a sad reality that my lack of organization had led to inefficient excess purchases, it also allowed me to keep them together so that in the future I can see the entire status of what is in the closet.
3. Bucket
Once you have batched similar elements, you can start to find the right containers to put them in. For some items, a basket or box may not be feasible (i.e. my paint cans just got stacked neatly together on a shelf rather than in a box). For other, smaller items, see if you can measure the type of box or basket you would need to contain them. I had a large section of holiday supplies and DIY supplies so I measured the needs and categories and then set out to the container store to find the right "buckets". I ended up finding the perfect drawer organizer to keep all my small nails and screws neatly sorted as well as cute farmer boxes with a lid for my holiday things. This way they could stay dust free and protected when stored. I linked all my finds below!
Remember, not every single item needs container and not all containers have to match exactly. In order to make your space work for you in the long-run and keep you organized, you should find the right type of container for the use of what you are storing in it.
Remember, not every single item needs container and not all containers have to match exactly. In order to make your space work for you in the long-run and keep you organized, you should find the right type of container for the use of what you are storing in it.
4. Label
Now that you have your shelves situated with your containers and "loose buckets" or items that standalone on the shelf but are still sitting with similar materials. You can begin labeling. I think labeling is one of the most important ways to make sure your efforts of organization stick around long after the day you organize. This is also the secret of sticking to your budget. You can find all sorts of labels at the container store, target or amazon ranging in price and once you have your labels on your buckets or areas on your shelf, it will be pretty difficult for someone to place something where it shouldn't belong.
Think about your silverware drawer in the kitchen. It's normally pretty rare for that drawer to get too messy because everything has a spot. Labels have the same effect in closets or pantries. Without much effort, they train your brain (or any passerby) to only place items where they belong. If they don't have a spot, it will force you to stop and think before throwing something into a place it doesn't belong and becoming a junk area.
Think about your silverware drawer in the kitchen. It's normally pretty rare for that drawer to get too messy because everything has a spot. Labels have the same effect in closets or pantries. Without much effort, they train your brain (or any passerby) to only place items where they belong. If they don't have a spot, it will force you to stop and think before throwing something into a place it doesn't belong and becoming a junk area.
I know it can be hard to get started on an organization project, but hopefully with these things in mind, you can make the transformation you are looking for and keeping looking fresh for a long time. Here is the before and after of my weekend activities as well as my favorite finds from the container store to help with the process.
before: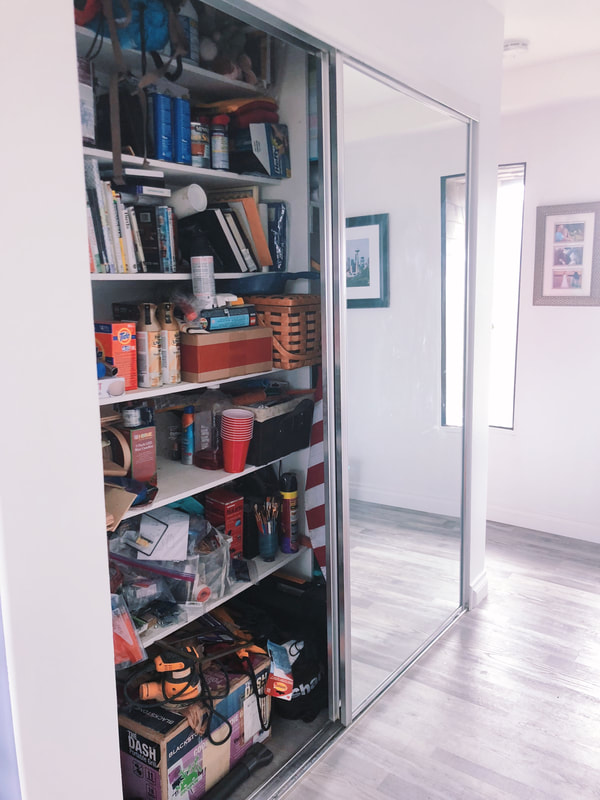 | after: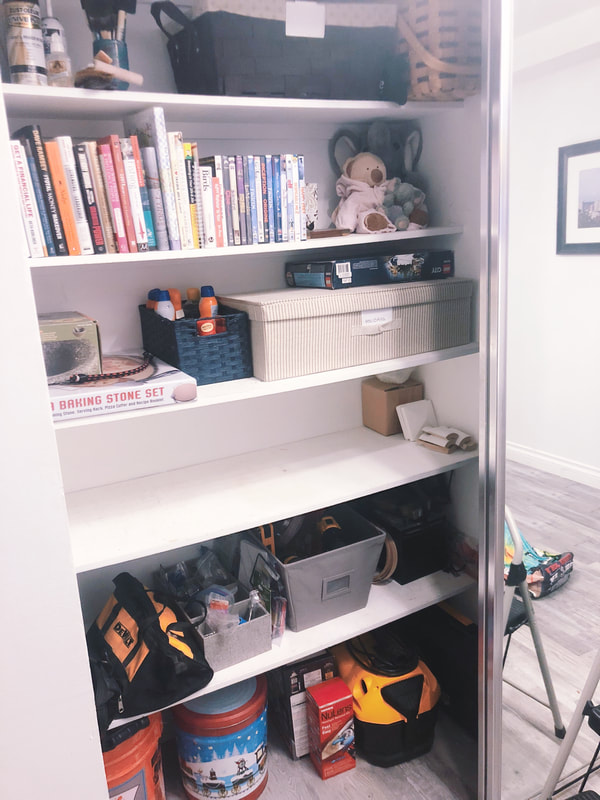 |
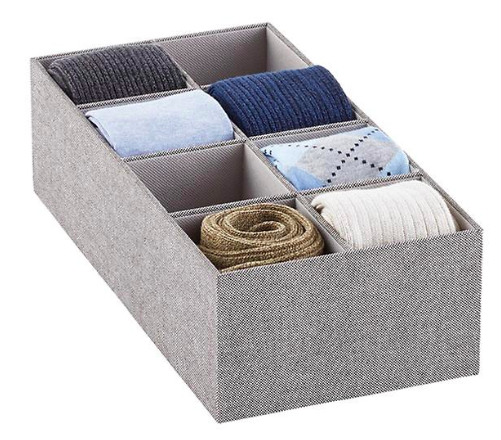 Drawer Organizer (I used for storing nails and screws) | 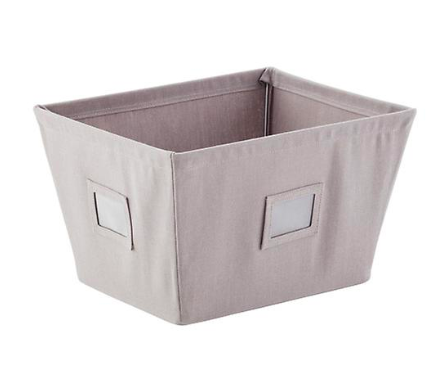 Open Canvas Bin (I used for easy in and out with my drill and sander) | 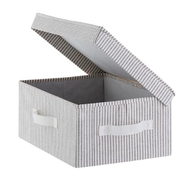 Farmhouse Storage Box (I used it for Christmas decoration storage). | 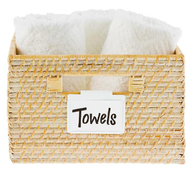 Bin Clip Label (on of my favorites! Used it on all the containers) |
Happy organizing! And remember if you every have any questions or need any help, send me an email or direct message on Instagram. I love chatting about how to make your home better :-).
xoxo,
jessica

| one | two | three | four | five | six |
Fall might not be in San Diego just yet, but the temperatures are cooling and I will take any excuse to get into sweater season (#myfave!) I'm not a huge fan of the color orange or Halloween, but I do love the mingling of fall colors and the neutral ways to add fall vibes to my home. Here are some of my top 6 things to start getting into the cozy, colorful season this year.
Fall might not be in San Diego just yet, but the temperatures are cooling and I will take any excuse to get into sweater season (#myfave!) I'm not a huge fan of the color orange or Halloween, but I do love the mingling of fall colors and the neutral ways to add fall vibes to my home. Here are some of my top 6 things to start getting into the cozy, colorful season this year.
- one: In the spring, I did a little DIY floral wreath that brought such a fun vibe to the front door. Now with the leaves changing everywhere but southern California, I fell in love with this find from Crate and Barrel to get into the fall spirit.
- two: Blanket scarves are one of my favorite things because of the very name. It can be a great throw blanket in your living room or you can quite literally wear it out the door. I love the neutral plaids for fall both in and out the house.
- three: Sometimes the bathroom, especially your own bathroom vs. the guest bathroom stays the same year round. This year, I'm excited to dress it up with some rust and white patterned towels. I struggle with orange/rust accents solo, but when they are balanced with white or cream, I'm all for it.
- four: One thing I have year round is scented candles. I just LOVE them! I never have been able to get on the pumpkin spice trend though, so rather than get a scent that screams fall, I opted for these super cute copper containers. The best part is once the candle is finished, you can scoop out the remaining wax and throughly wash the container for a catch-all or trail mix bowl.
- five: Autumn florals like wheat or ilex berries are a fun and different way to get some fall indoors. Don't get me wrong, I like pumpkins too, especially the mini white ones, but for some other details, wheat filled mason jars or tall ilex berry filled vases can make a great statement.
- six: Throwing on a cozy robe on a cool fall morning to watch football on the couch or read a book with some coffee is the best! I am really loving this oatmeal colored, cotton one from Ugg.
xoxo,
jessica
7/10/2018 1 Comment
Getting Ready for Guests
 |  |

 |  |
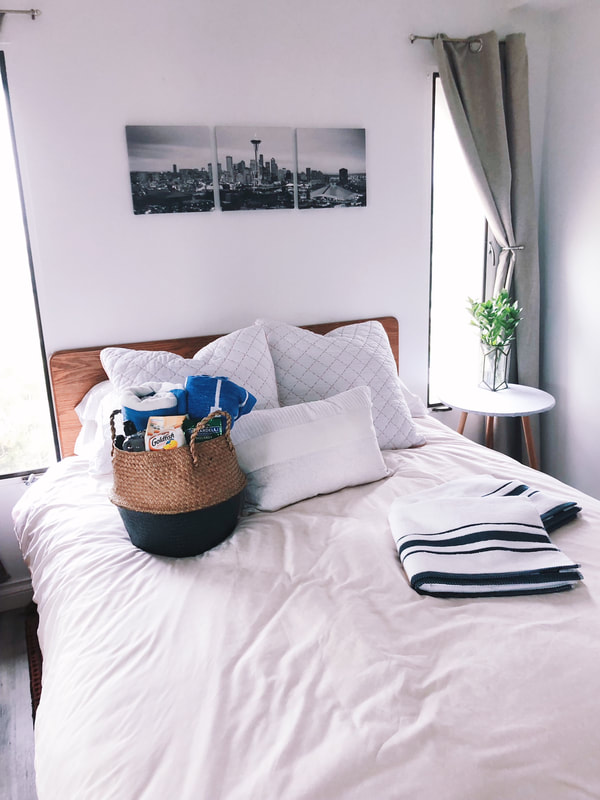
(We had the best time last week hosting family for the holiday weekend. We spent tons of hours at the pool (with plenty of sunscreen and my new DIY Day hat!) and enjoyed so many delicious meals, drinks and laughs together.
Brad and I are often hosting friends and family and so we have a great little routine for prepping the house and guest rooms to ensure our visitors have the best stay. Today, I'm sharing some of my guest prep secrets (post the obvious clean house and clean sheets) so that they feel comfortable, at home, and even a bit pampered as they arrive.
Brad and I are often hosting friends and family and so we have a great little routine for prepping the house and guest rooms to ensure our visitors have the best stay. Today, I'm sharing some of my guest prep secrets (post the obvious clean house and clean sheets) so that they feel comfortable, at home, and even a bit pampered as they arrive.
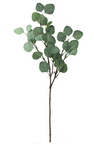
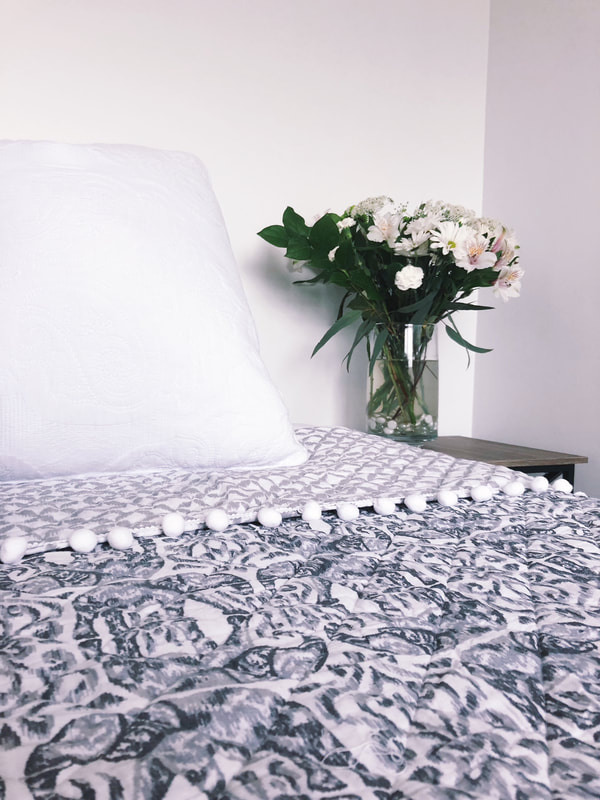
1. Add some greenery
Some fresh flowers or branches bring such an organic and natural feel to the space. I think of it like adding jewelry to your outfit, but for your room. A little accessory that goes a long way. The green stems I have pictured have lasted for over 3 months from Trader Joe's and I've only changed the water once so it's a really low cost way to make a big impact.
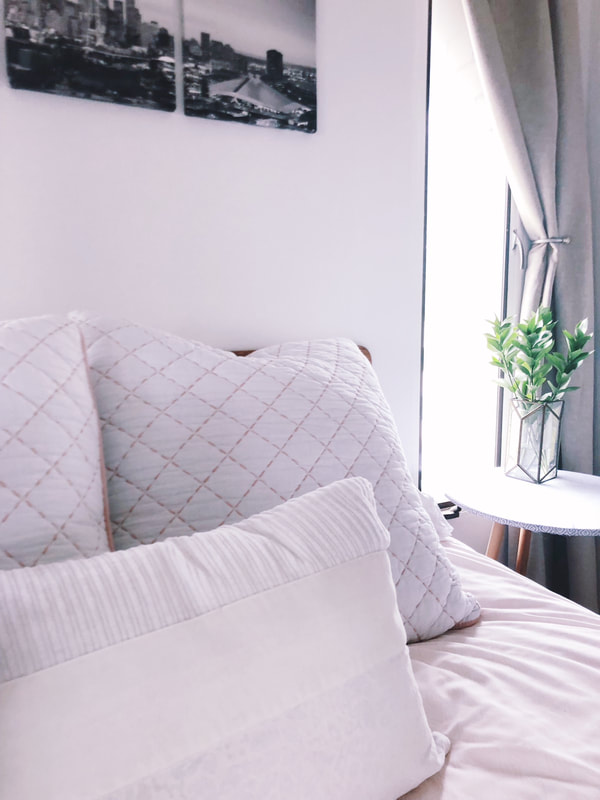
2. Pillow it up
Weather you go with a couple of oversized pillows or a cascade of throw pillows, adding pillows brings in some character and tons of comfort. I found these jumbo ones for such a deal at Home Goods. I'm so obsessed with pillows, I think overtime I'll add a few more. I may get a smaller one that I can easily change with the seasons or feel of the room.
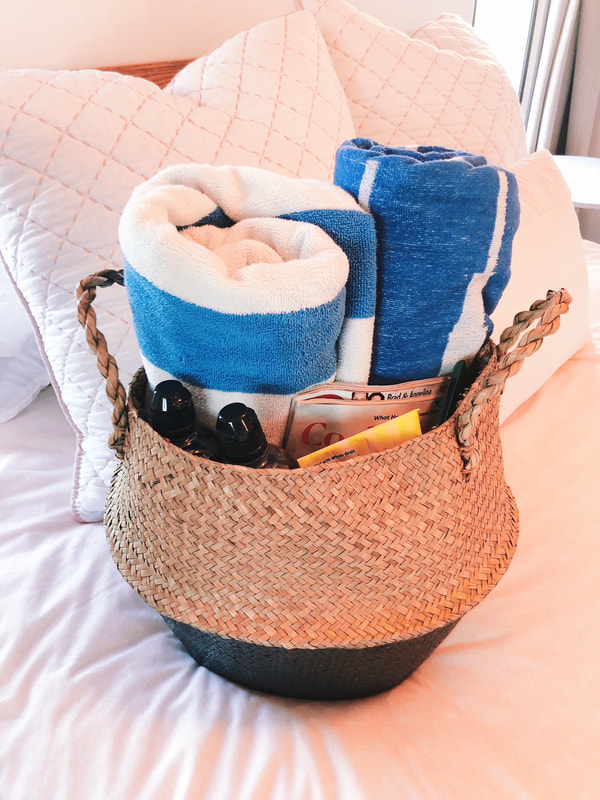
3. Get the Essentials
Lay out towels on the bed (bath and pool towels if applicable), ensure the bathroom is stocked with extra toiletries and plenty of toilet paper and clean out all the trash cans. There is nothing worse than being a guest at someone's house and realizing at the last minute you forgot shampoo or even worse, finishing a roll of toilet paper and having no idea where to find another. Keeping everything in the guest area stocked make it easy for your visitors. As an extra bonus, head over to your local CVS or Walgreens and get a few travel sized goodies that you can keep in the bathroom. You can also get these in bulk on Amazon and keep them on hand for your next guests.
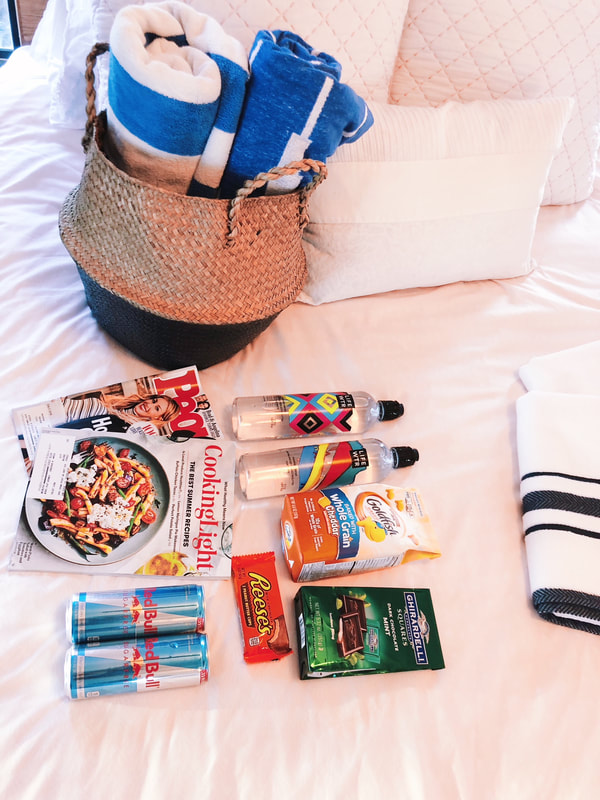
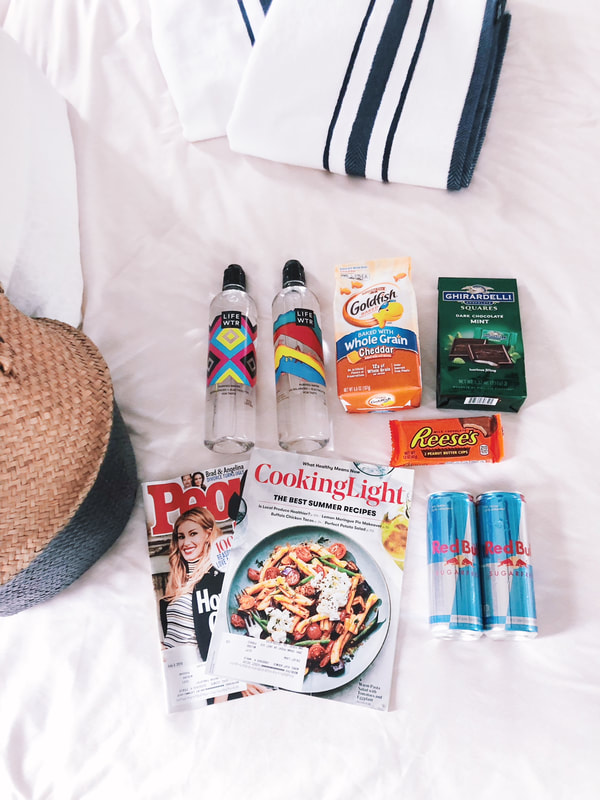
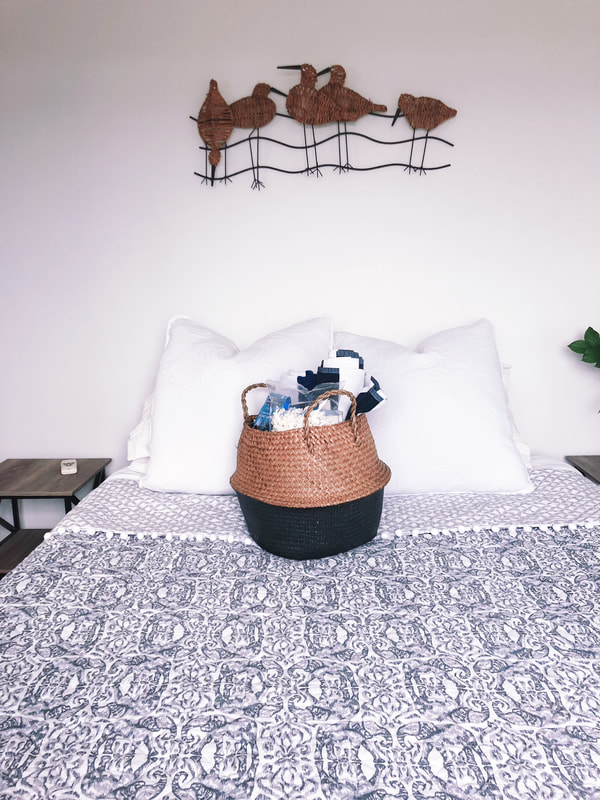
4. Gift Basket Galore
This is something my mom still does for us when we come visit and it always makes us feel so special! Stock a basket with water bottles, snacks, sweet treats, and more. You can be creative and play it up based on your guests and what they like. In this batch, I included some of their favorite snacks and magazines for pool reading. I knew my sister and brother in-law were going to be on east coast hours so got them some energy material if needed too.
I always have so much fun prepping for guests and finding little ways to make their stay a bit more memorable. Sometimes I do it through the activities planned, other times through the meals we have, but always through the first impression as they walk into their rooms.
I'd love to hear how you prep for your guests too, what are some of your favorite things to do or decor to add to the rooms?
I'd love to hear how you prep for your guests too, what are some of your favorite things to do or decor to add to the rooms?
xoxo,
Jessica
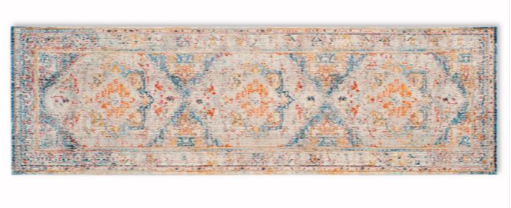
Classic Rugs for Your Living Room
Isn’t it funny how rugs can make a room. To me they serve a few key purposes.
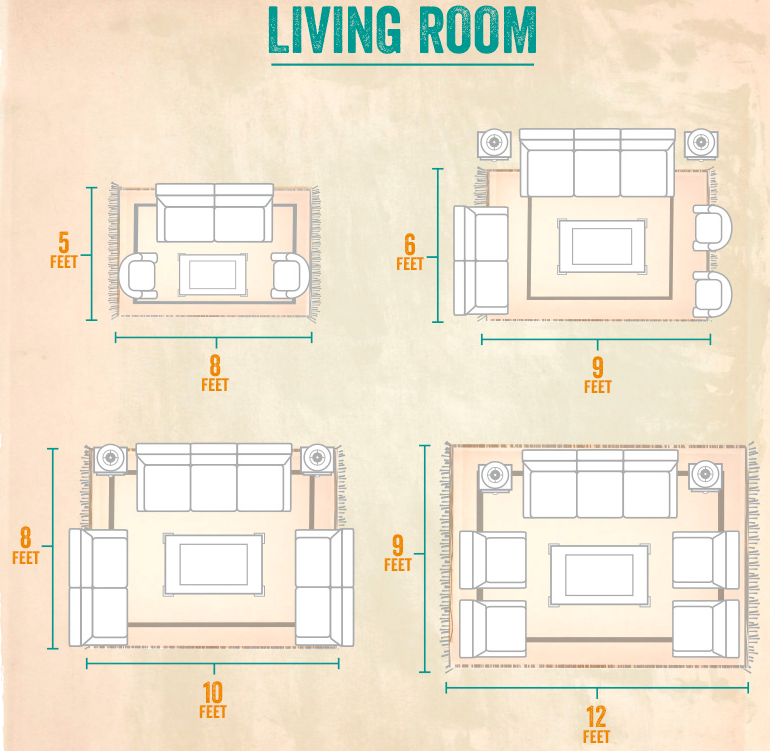
Once you know that you need a rug, a few questions come rushing in. What size do you I get, what type (shaggy, jute, woven), and then how do I place it, under the couch. Here are a few of my go-to rules for find the perfect size rug and how to place plus a few of the rugs I can’t get enough of right now!
- They bring an organic coziness to a room
- They bring dimensional layering to the space
- They balance a room from other décor choices. – if you have a lot of patterns on the wall, a neutral rug can tie it together. Vis versa, if you have a lot of neutrals going on, you can add a patterned rug in the same color tone to create a fun and unique look.
Once you know that you need a rug, a few questions come rushing in. What size do you I get, what type (shaggy, jute, woven), and then how do I place it, under the couch. Here are a few of my go-to rules for find the perfect size rug and how to place plus a few of the rugs I can’t get enough of right now!
I found this little "cheat sheet" from the HomeEdit and it's the perfect starting point to help get a sense of size. In most of the below examples you can see that the sofa is either fully on or partially on the rug. I like this rule 90% of the time, but sometimes I want to show off gorgeous wood floors with some lifted mid-century modern furniture. In those cases I like to put one side of furniture on the rug and one side off. It keeps the balance of organic, while still enhancing the features of the room.
A few of my favorites!

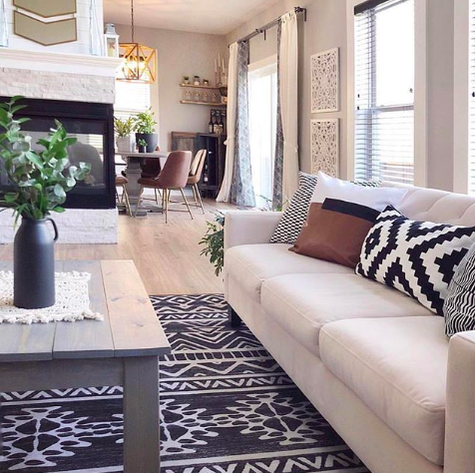
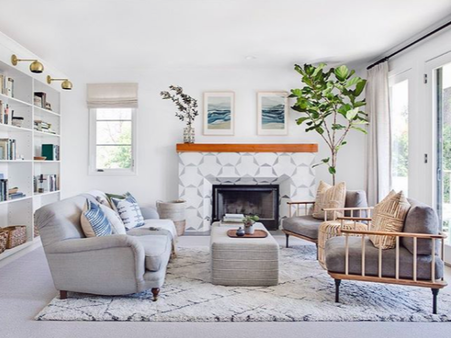
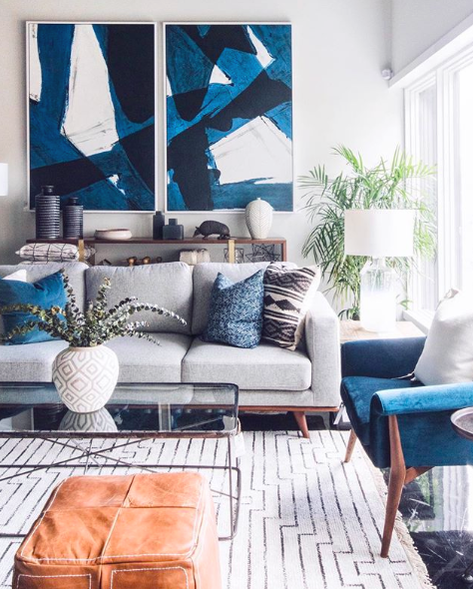
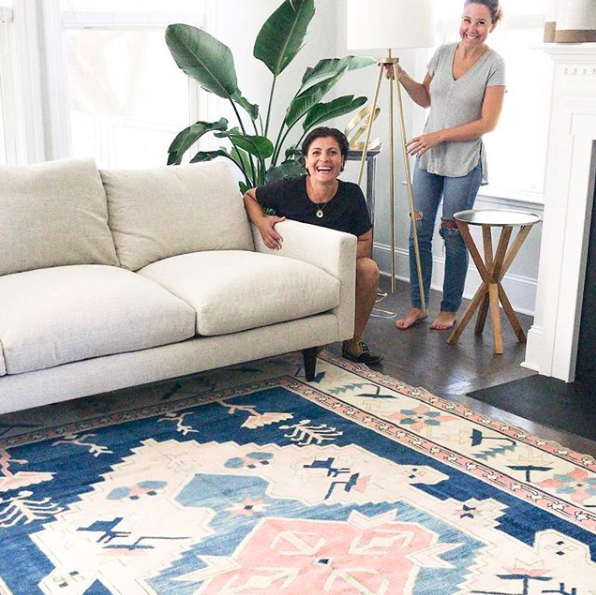
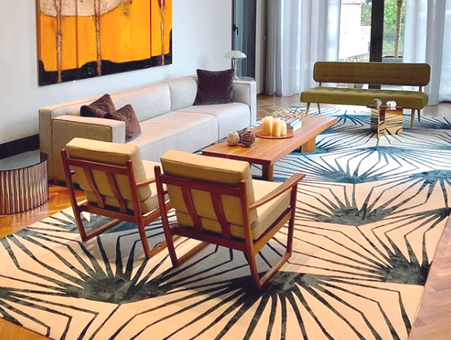
I can't get enough of these blue rugs!
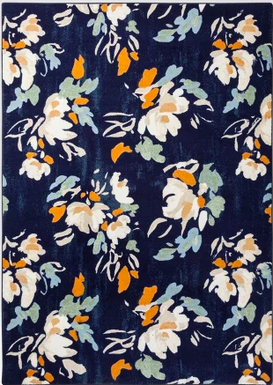
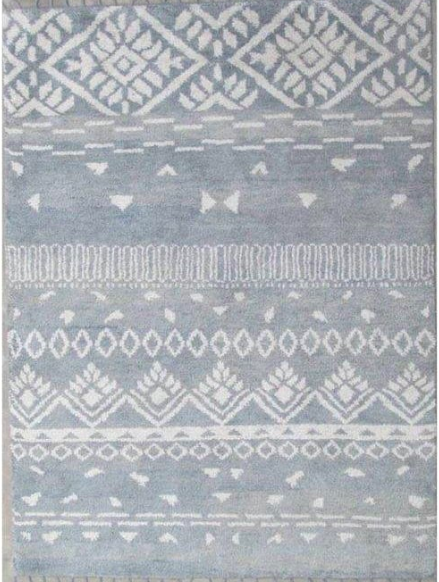
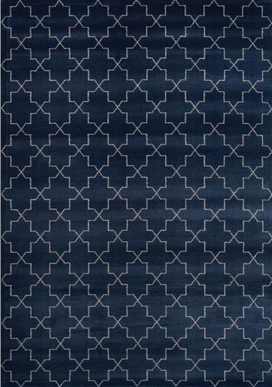
Hope you find the perfect rug and if you want to share, be sure to tag @beyondtheclock for how you styled your room!
Hope you find the perfect rug and if you want to share, be sure to tag @beyondtheclock for how you styled your room!
xoxo,
Jessica
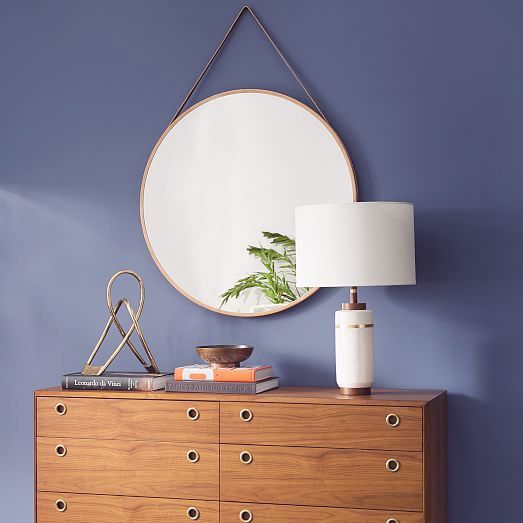
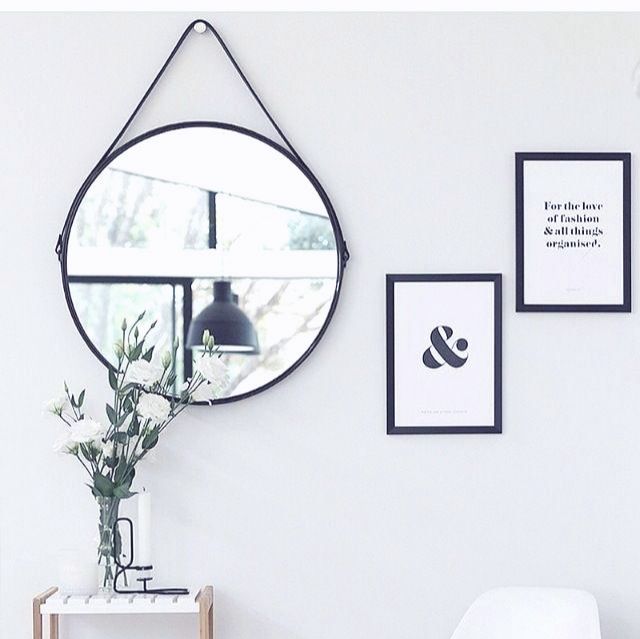
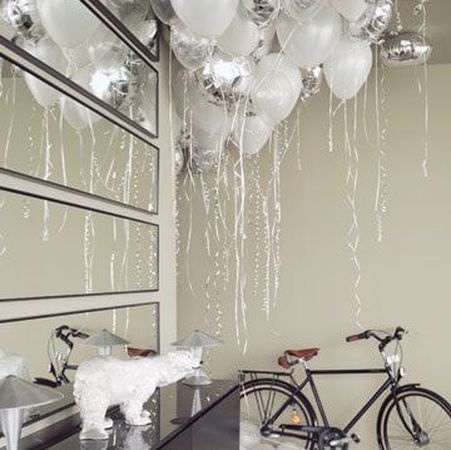
I have a bit of a love hate relationship with mirrors. There are times where they can totally make a room by bringing in more light, making a room bigger, or adding a unique detail with a frame or hanging. Then there are other times, mostly in older homes or small spaces, where people go mirror overboard and make the feature tacky rather than classy. You know what I’m talking about, those full mirror walls that make a living room look more like a dance studio. Thank goodness, mirror details have come a long way. Here are some of my favorite ways to use mirrors in your home or office
1. Leather hanging round mirror
This modern look is perfect in a bathroom or entryway to add a bit of character with the rounded shape. It's also a less expensive way to make the feature bigger by having the hanging materials be a part of the masterpiece.
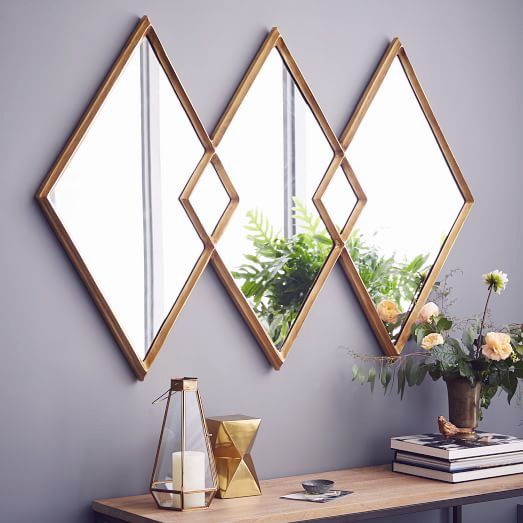
2. Triple Horizontal Catch-all
Whether you place these pieces in an entryway above a "catch=all" table as I like to call it or in a dining room above a side-board. These triple combo mirrors are statement pieces that will give your room both art and depth. They can also be really affordable using inexpensive behind the door mirrors for this lux stacked mirror look.
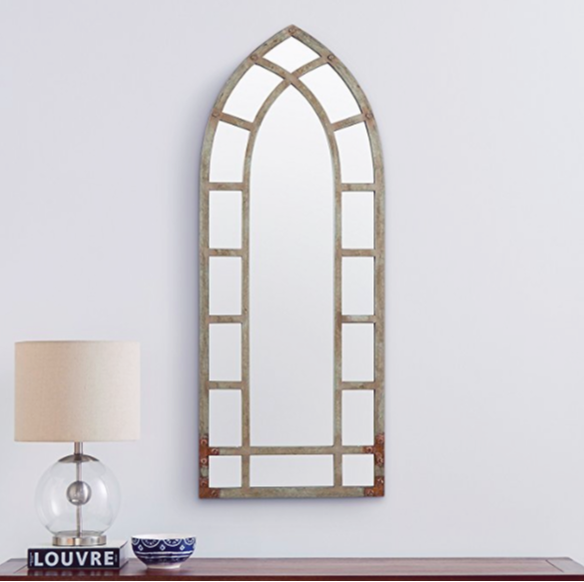
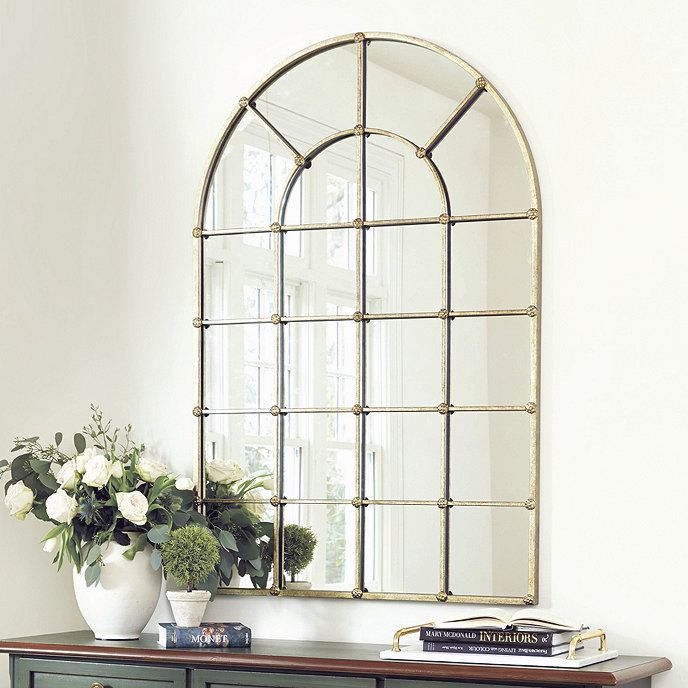
3. Antique Arched Mirrros
I love these pieces to bring some vintage details into your home while still keeping things modern and fresh. The are also great accents to a farmhouse style. My favorite place to use mirrors like these is behind nightstands in a bedroom or picking up two to flank a TV or feature in the living room.
4. Hallway or Office Whiteboard
Traditional whiteboards can really make a place look more like a classroom than a home, but they are SO functional. This is a great blend to keep your space looking fresh and modern while allowing you a place to write your family's menu and to-do list. It's also great in commercial spaces like cafe's and office lunch rooms. Almost all mirrors work for this use, I picked mine up at home goods. Then stock up on some dry-erase pens and you will be good to go.
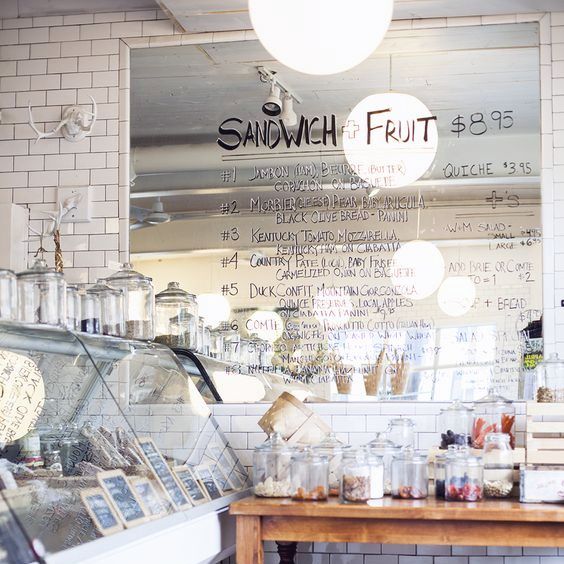 Photo: indulgy.com | 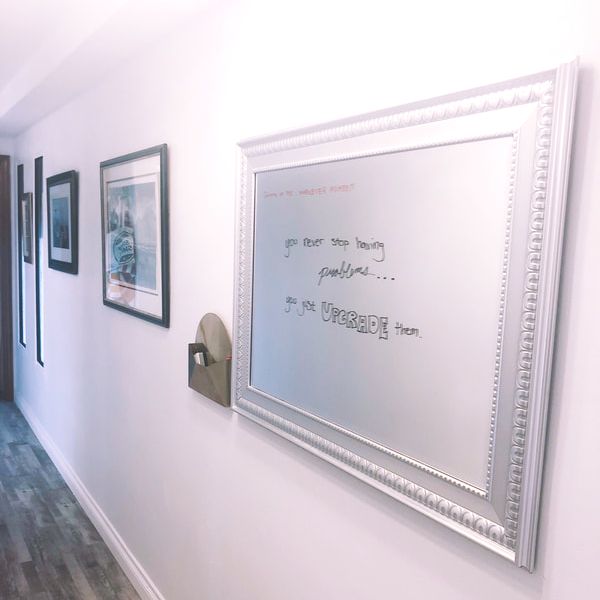 Photo: Beyond the Clock |
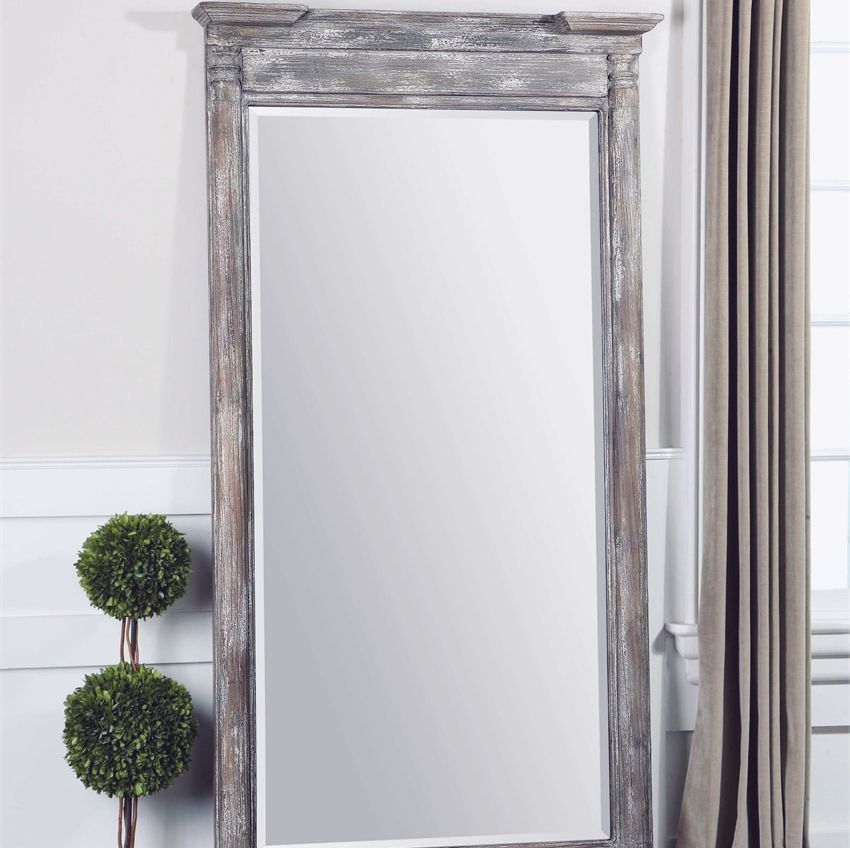
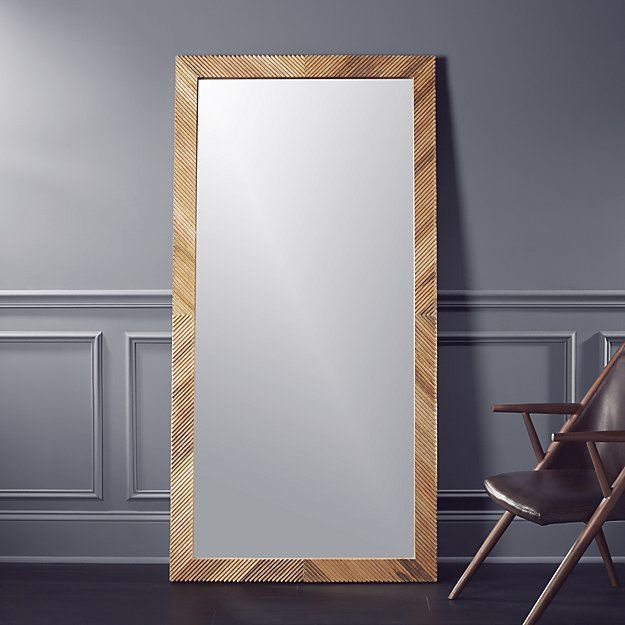
5. Giant Leaning Floor Mirrors
Ever wonder how bloggers get such good mirror selfies... these are the answers. Oversized floor mirrors are great for a bedroom or near a garage door to get a final look on your way out the door.
6. Glass Trays
Glass trays are a my favorite way to glam up a space. I like it best for a guest room or bathroom to display little trinkets for your guests. It's also the perfect add to a coffee table.
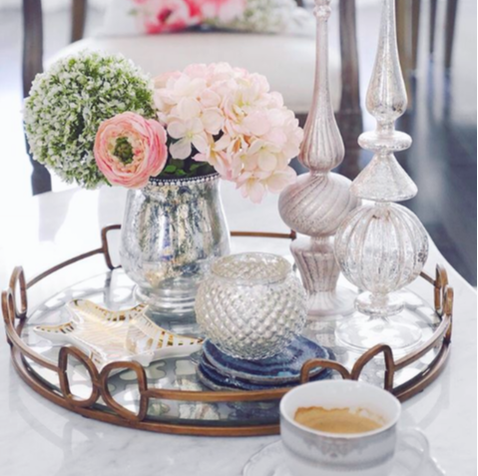 Photo: ClassyGlamStaging...similar HERE |  |
Can't wait to hear about your favorite ways to use mirrors. I'd love to see how you styled it. #beyondtheclock when you post to instagram so we can see your creative uses!
xoxo,
Jessica
Archives
October 2019
September 2019
August 2019
July 2019
June 2019
May 2019
April 2019
March 2019
January 2019
December 2018
October 2018
September 2018
July 2018
June 2018
May 2018
April 2018
March 2018
February 2018
January 2018
December 2017
Categories
All Accent Pieces Action Planner Basket Baskets Bathroom Bedroom Branch Floral Arrangements Bud Vase Candles Cherry Blossoms Curtains Cylinder Vase Decor Accents DIY Door Mat Family Flare Vase Floral Notebook Floral Water Bottle Flowers Flower Wreath Flower Wreaths Furniture Gifts Greenery Guest Room Home Home Decor Indoor Plants Jeans Living Room Mirrors Narrow Neck Vase Nightstand Outdoor Living Pastels Personal Development Productiity Rugs Seat Cushions Shelf Decor Shower Sneakers Spring Spring Decor Spring Ideas Storage Ideas Style With Time Styling Tips Sunglasses Table Lamp Throw Blanket Vase Vases
